Assets
The assets tab is where you can upload your content.
PiSignage handles content of multiple types from images, videos to even complex livestreams, HTML pages, web-links, etc. All of your content is managed in the assets pane with the ability to configure category filters, folder views, validity and more.
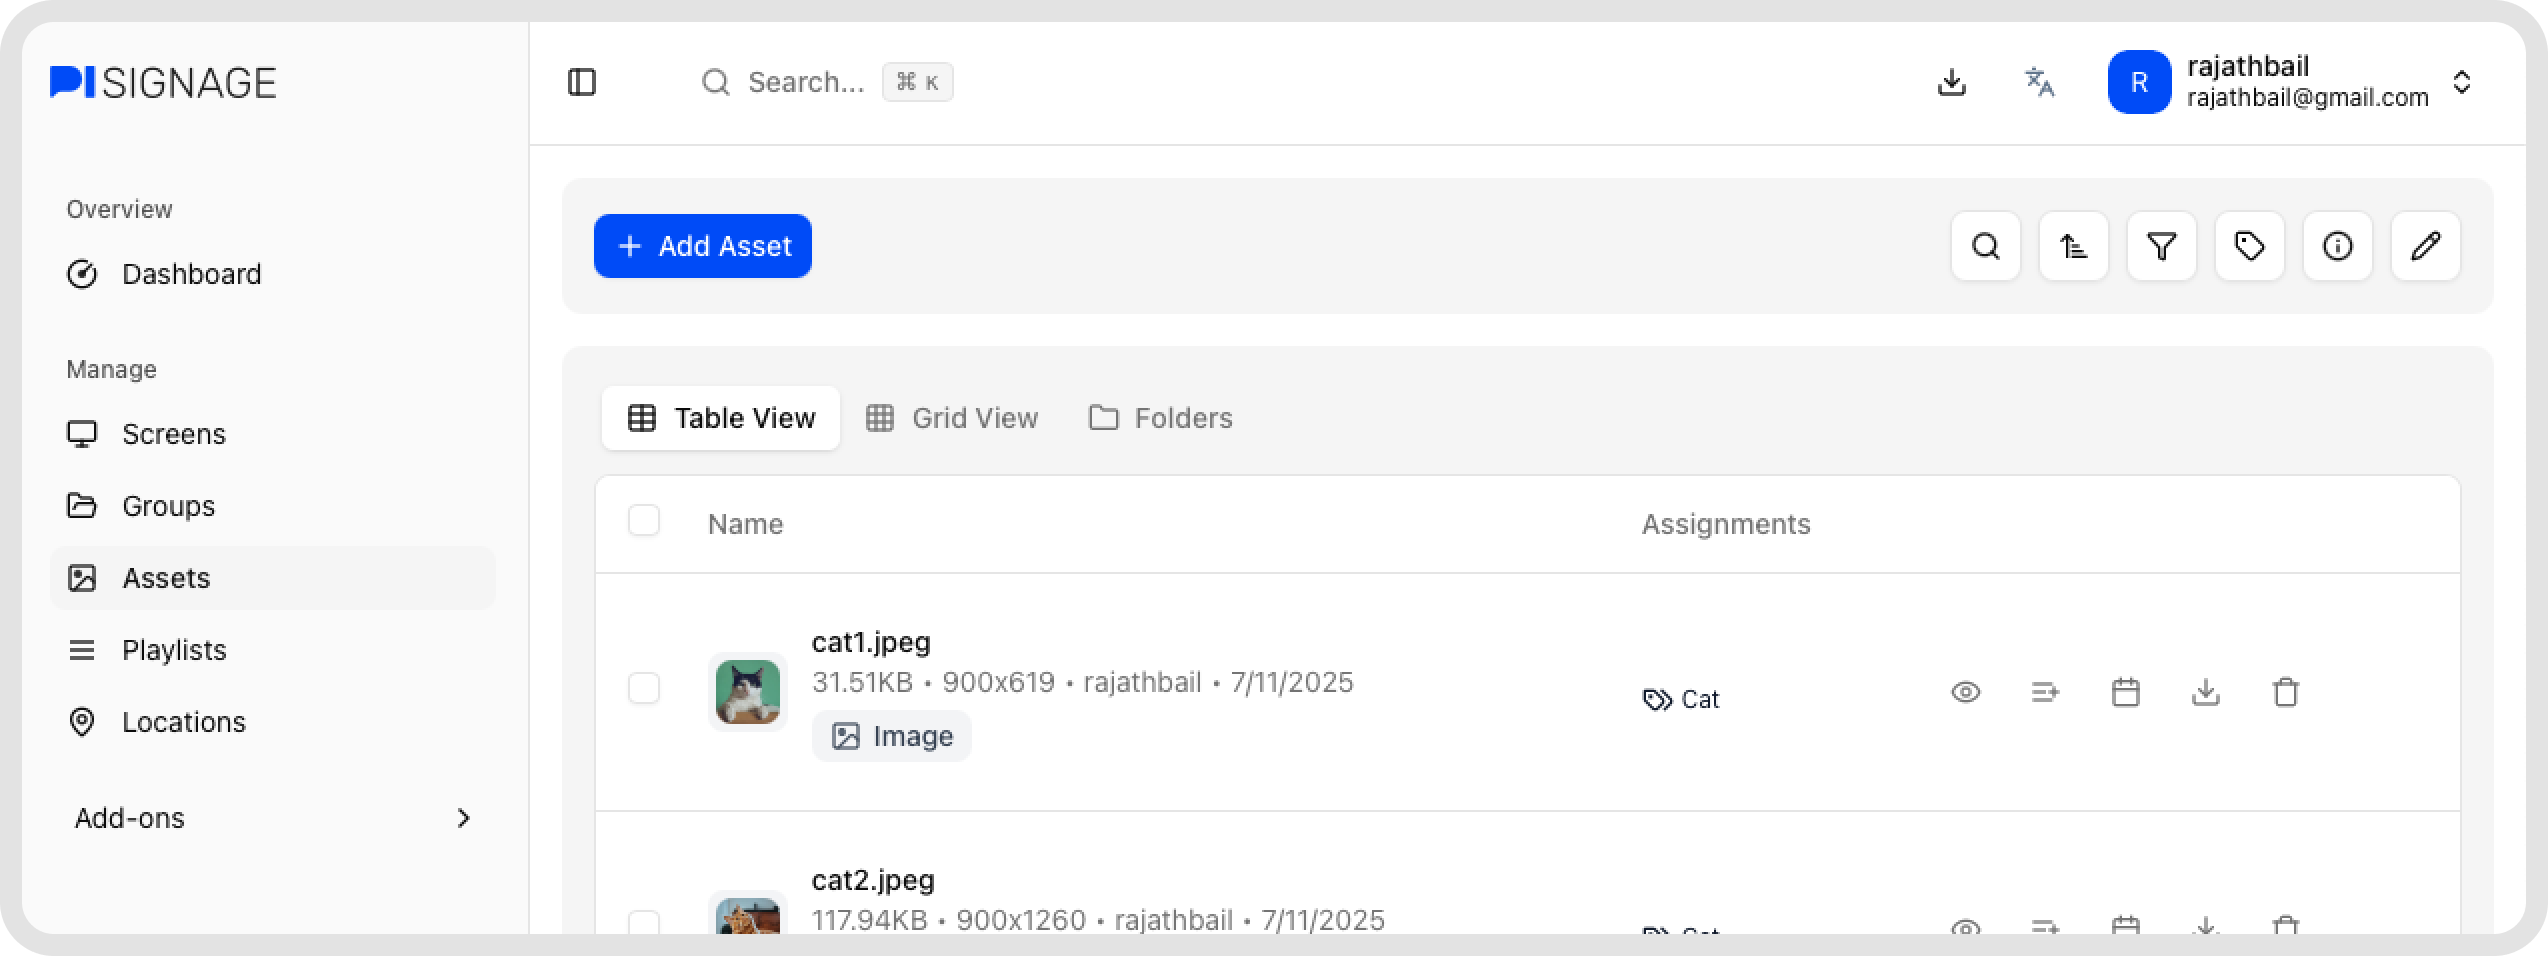
Adding an asset
Adding an asset is as simple as dragging and dropping your assets from your file system to the assets page. Alternatively you can click on the + Add Asset button at the top of the assets page.
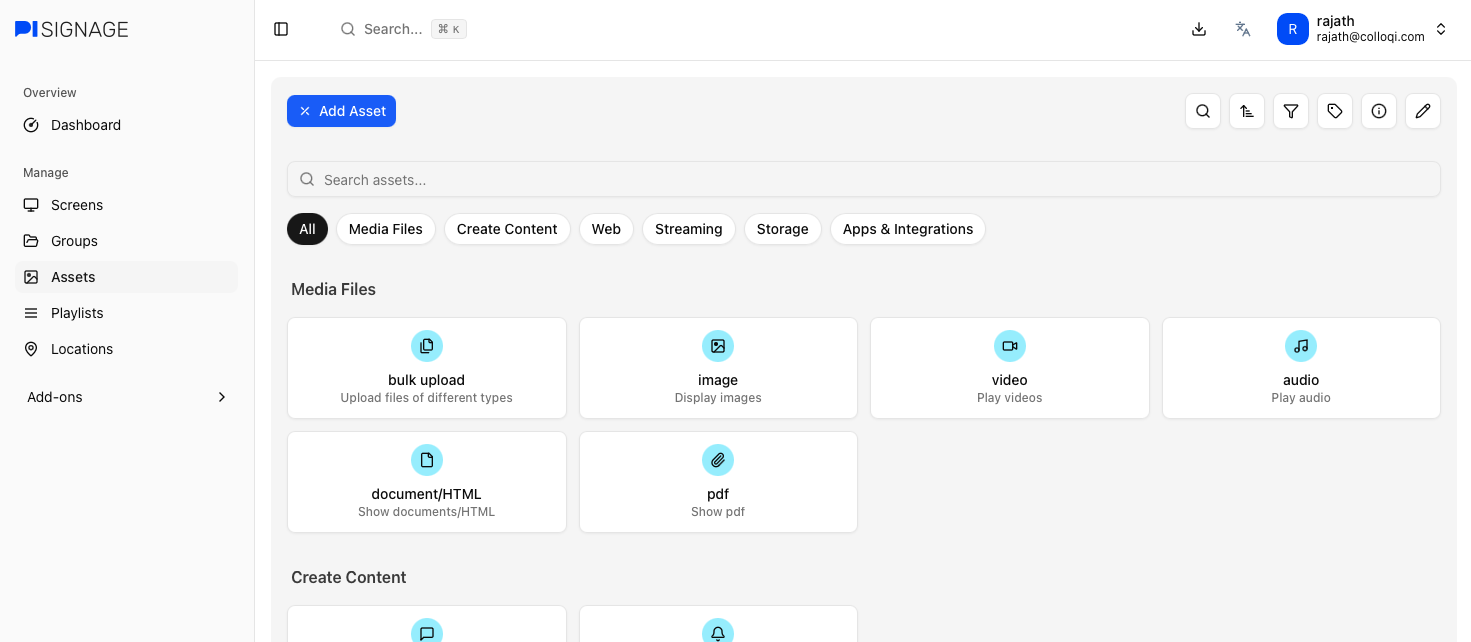 You will see individual tiles to upload every type of asset. Choose the appropriate tile to begin adding the same. Bulk Upload is a great option if you want to select multiple files of varying types and upload them at once.
Step 1 → Choosing an Asset Types
This section covers the various types of assets available in PiSignage.
If there is an asset type that you do not see here but would like us to support please write to support@pisignage.com.
Bulk upload
Bulk upload lets you upload files and documents of various types from your filesystem directly to PiSignage.
 Press shift + click or cntrl/cmd + click to select your assets before uploading them. You could alternatively drag and drop your assets to the main window.
There is a 3GB limit per upload
Image
Upload and display image files. Supports common formats like JPG, PNG, GIF, and SVG.
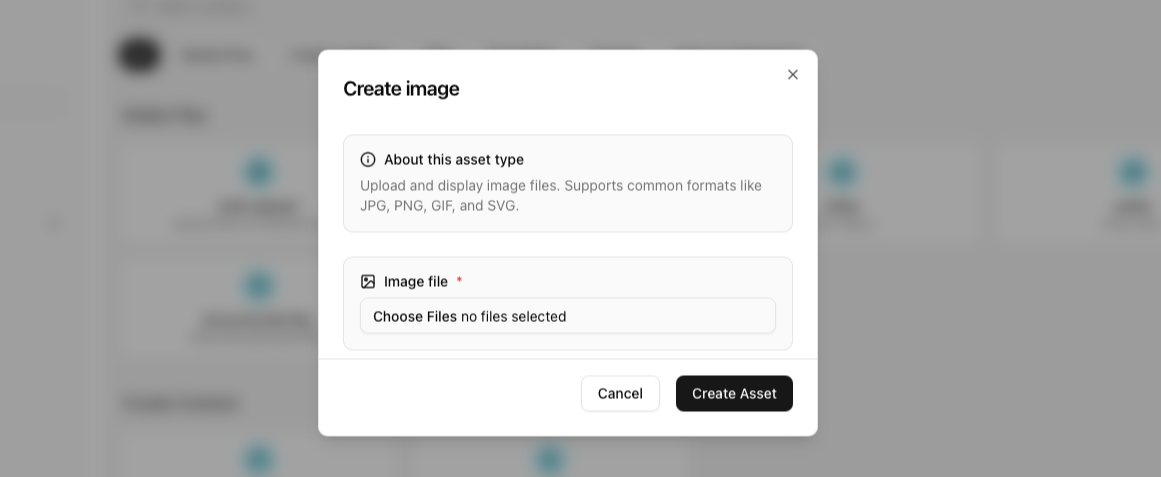 You can upload multiple images at once as well.
Some formats like HEIF, WebP may need to be converted to optimize performance on other hardware
Video
Upload and play video files. Supports common formats like MP4, WebM, and AVI.
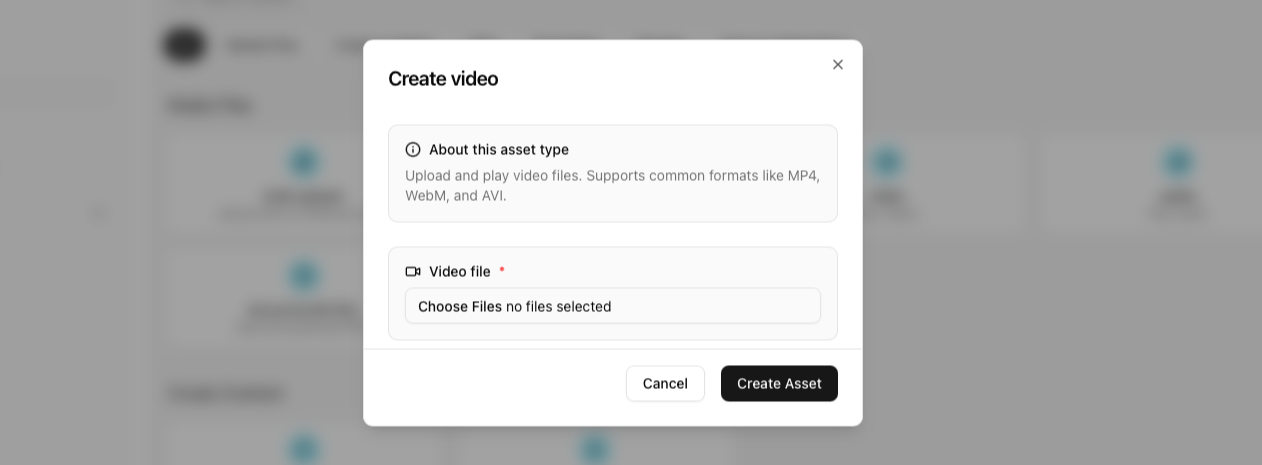 You can upload multiple videos at once as well.
All videos are converted to MP4 to optimize for all hardware
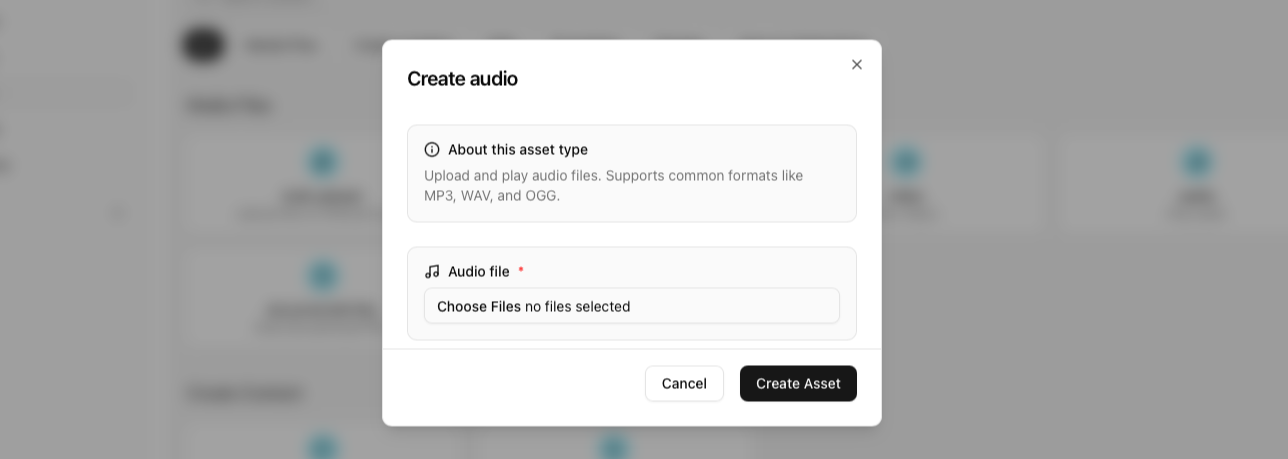
Audio
Upload and play audio files. Supports common formats like MP3, WAV, and OGG.
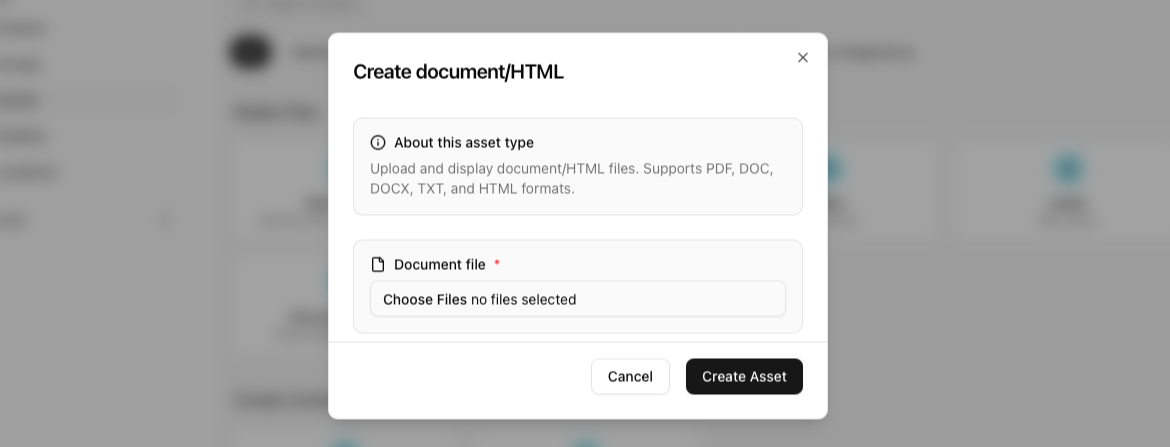
Document / HTML
Upload and display document/HTML files. Supports PDF, DOC, DOCX, TXT, and HTML formats.
 PiSignage can handle and render HTML files as interactive pages. You can either choose to upload an
Individual HTML file
Or a HTML based project folder as a .ZIP file. Please ensure that this folder contains an index.html file for the platform to know what to render first.
Upload and display pdf files. Supports the standard PDF format (single or multi-page).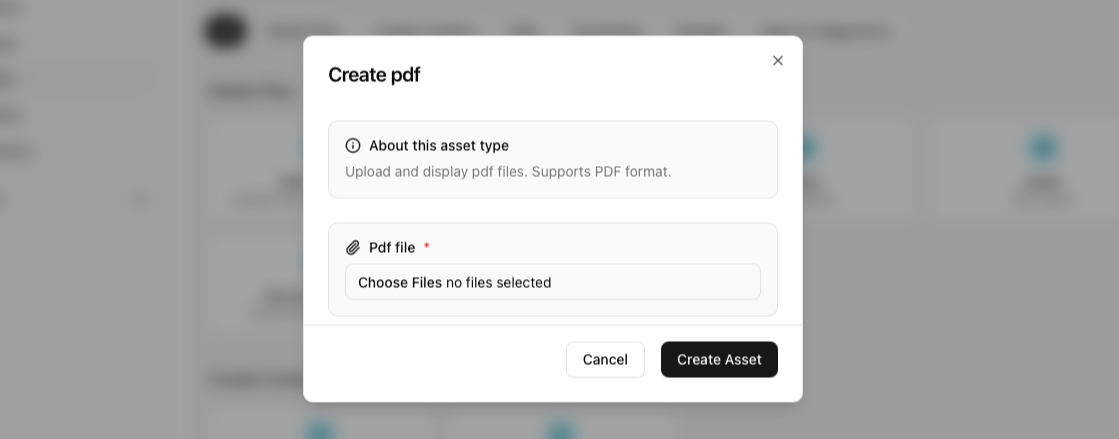
Message
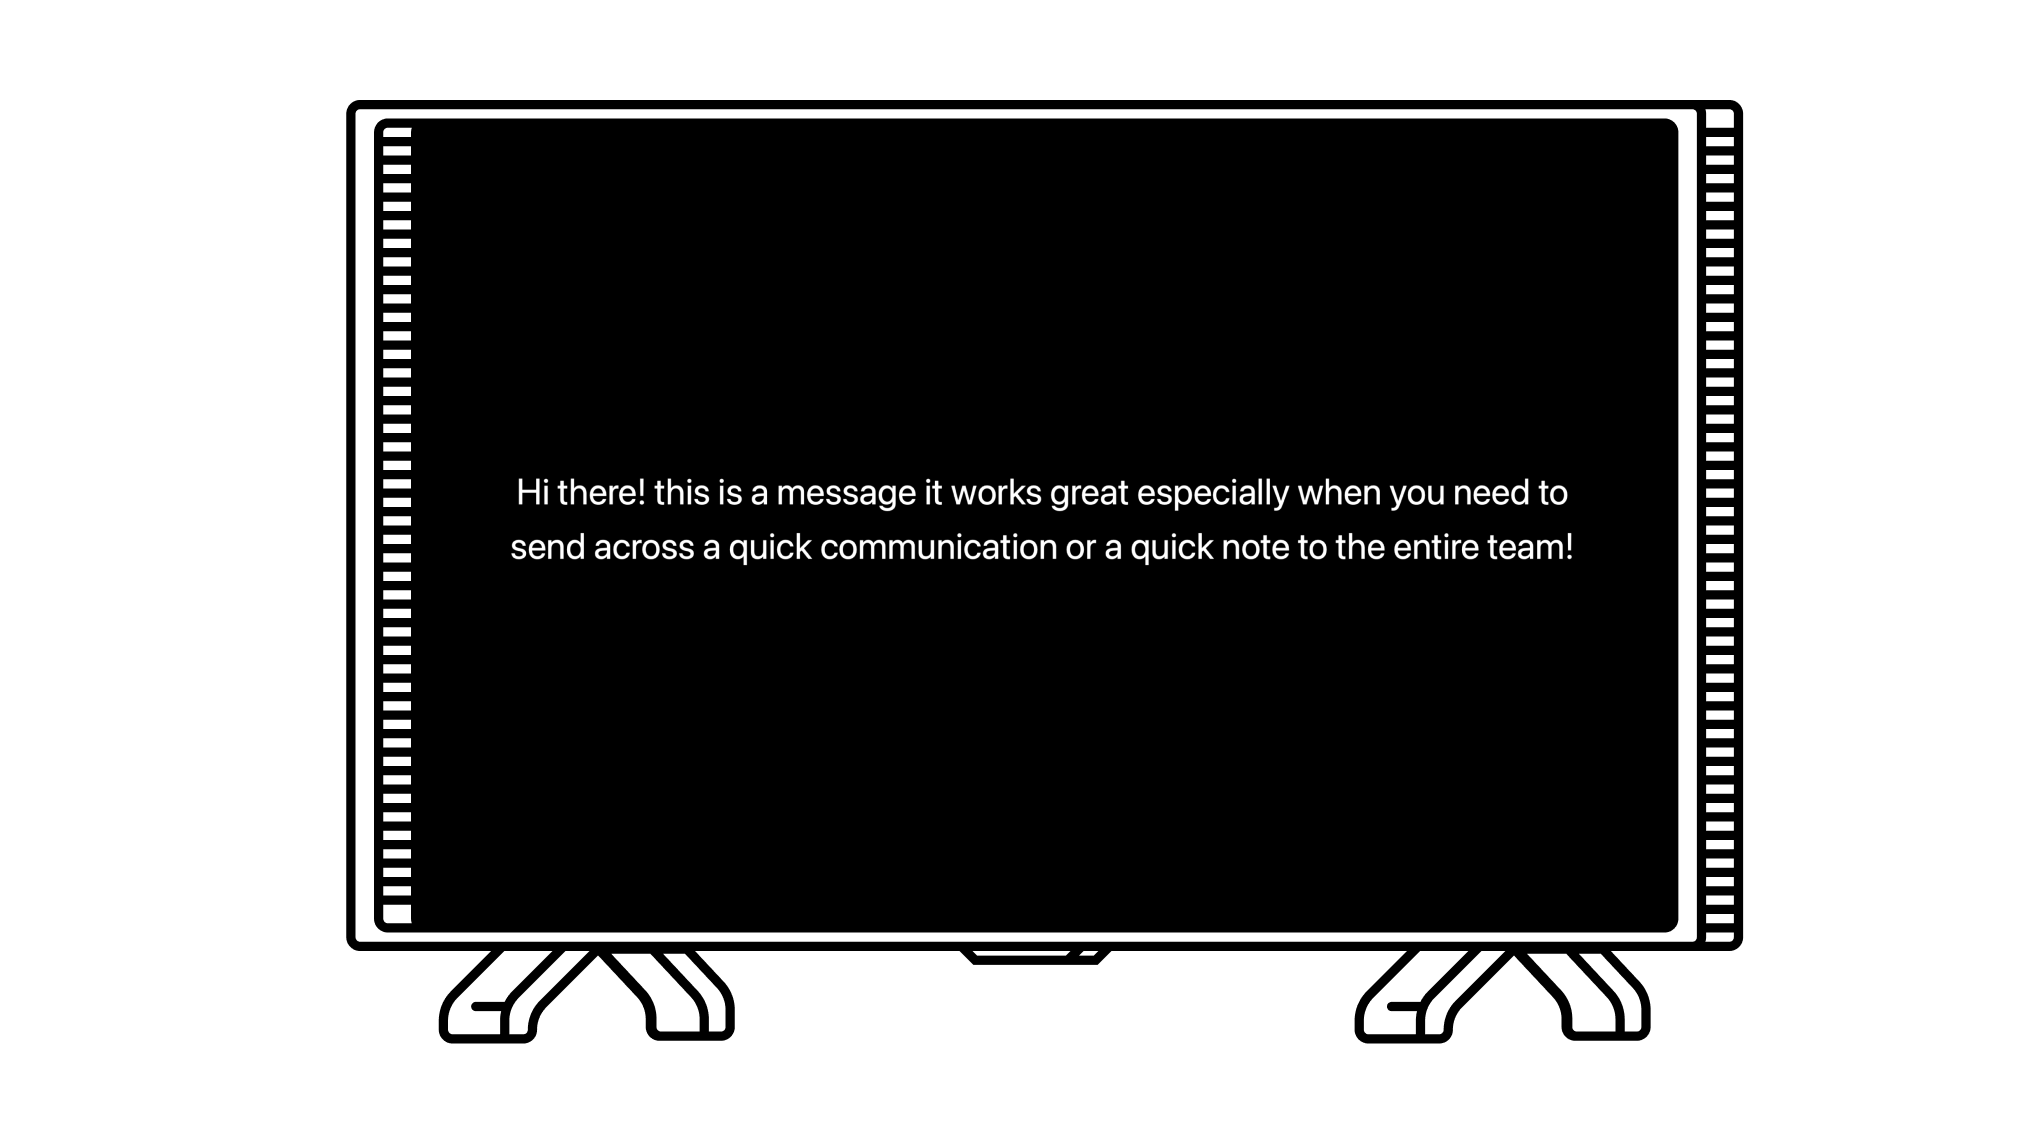
Create custom text messages with optional styling. Perfect for announcements or information displays.
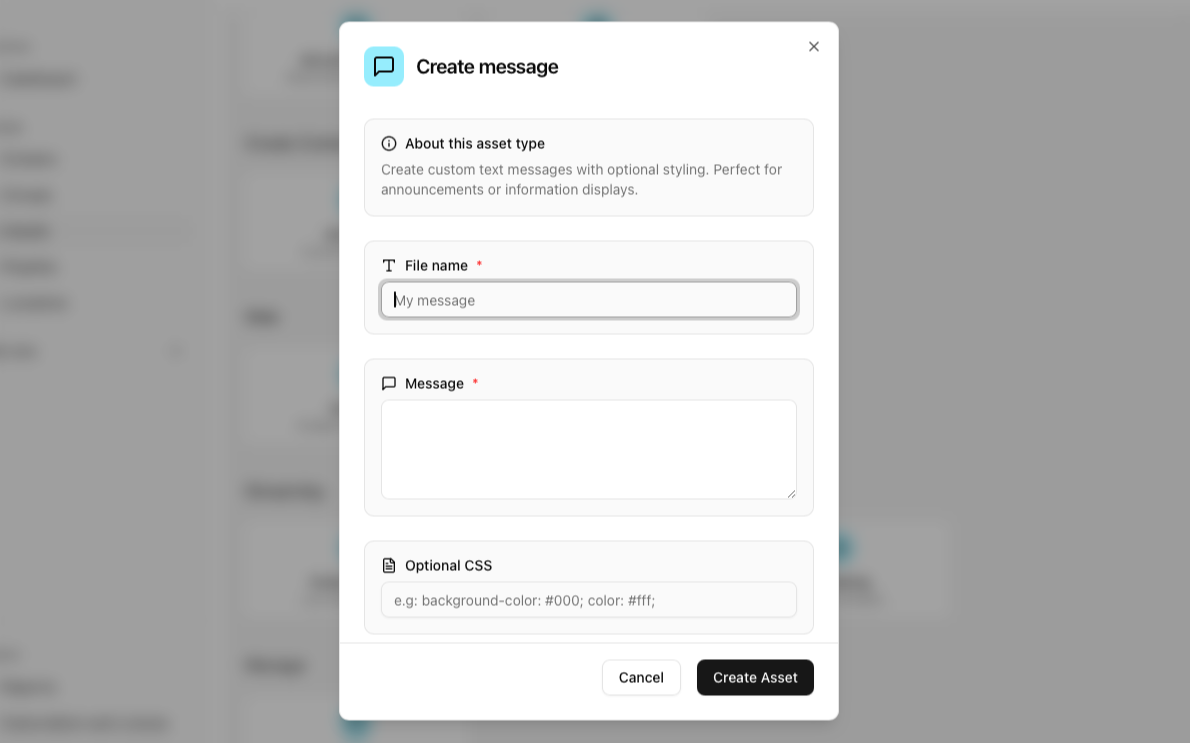 It renders on a TV as shown below. You can choose to also add optional CSS value to style it as needed.
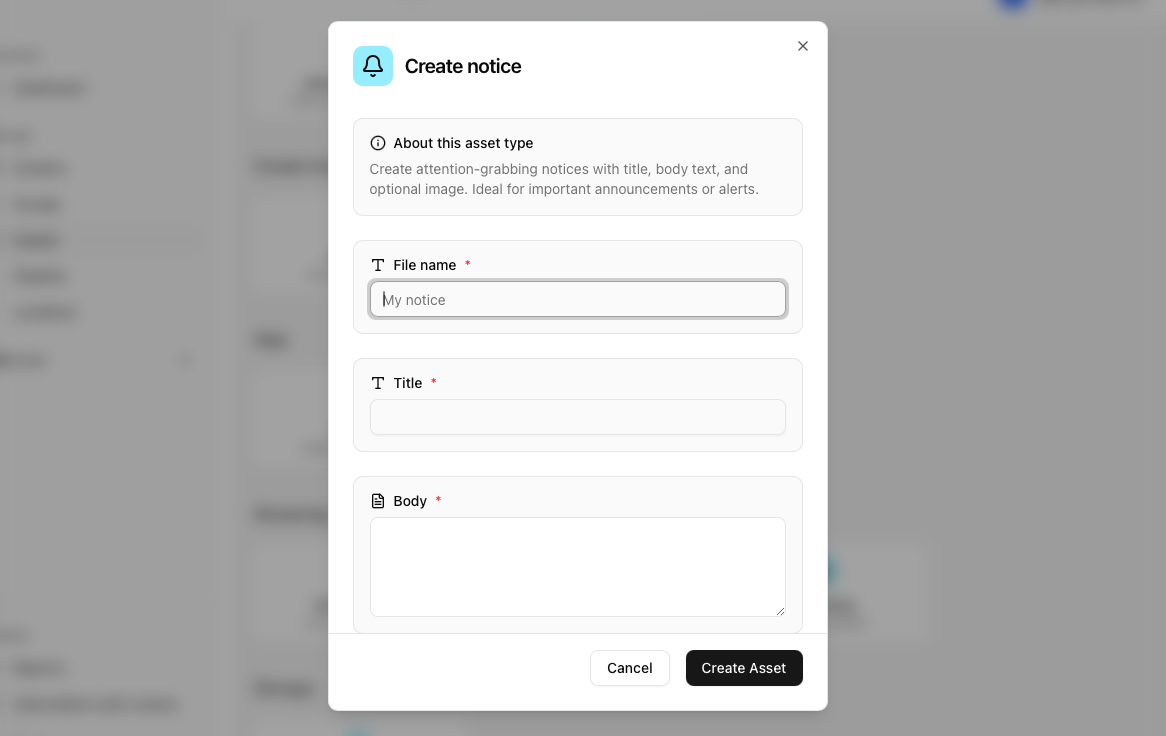
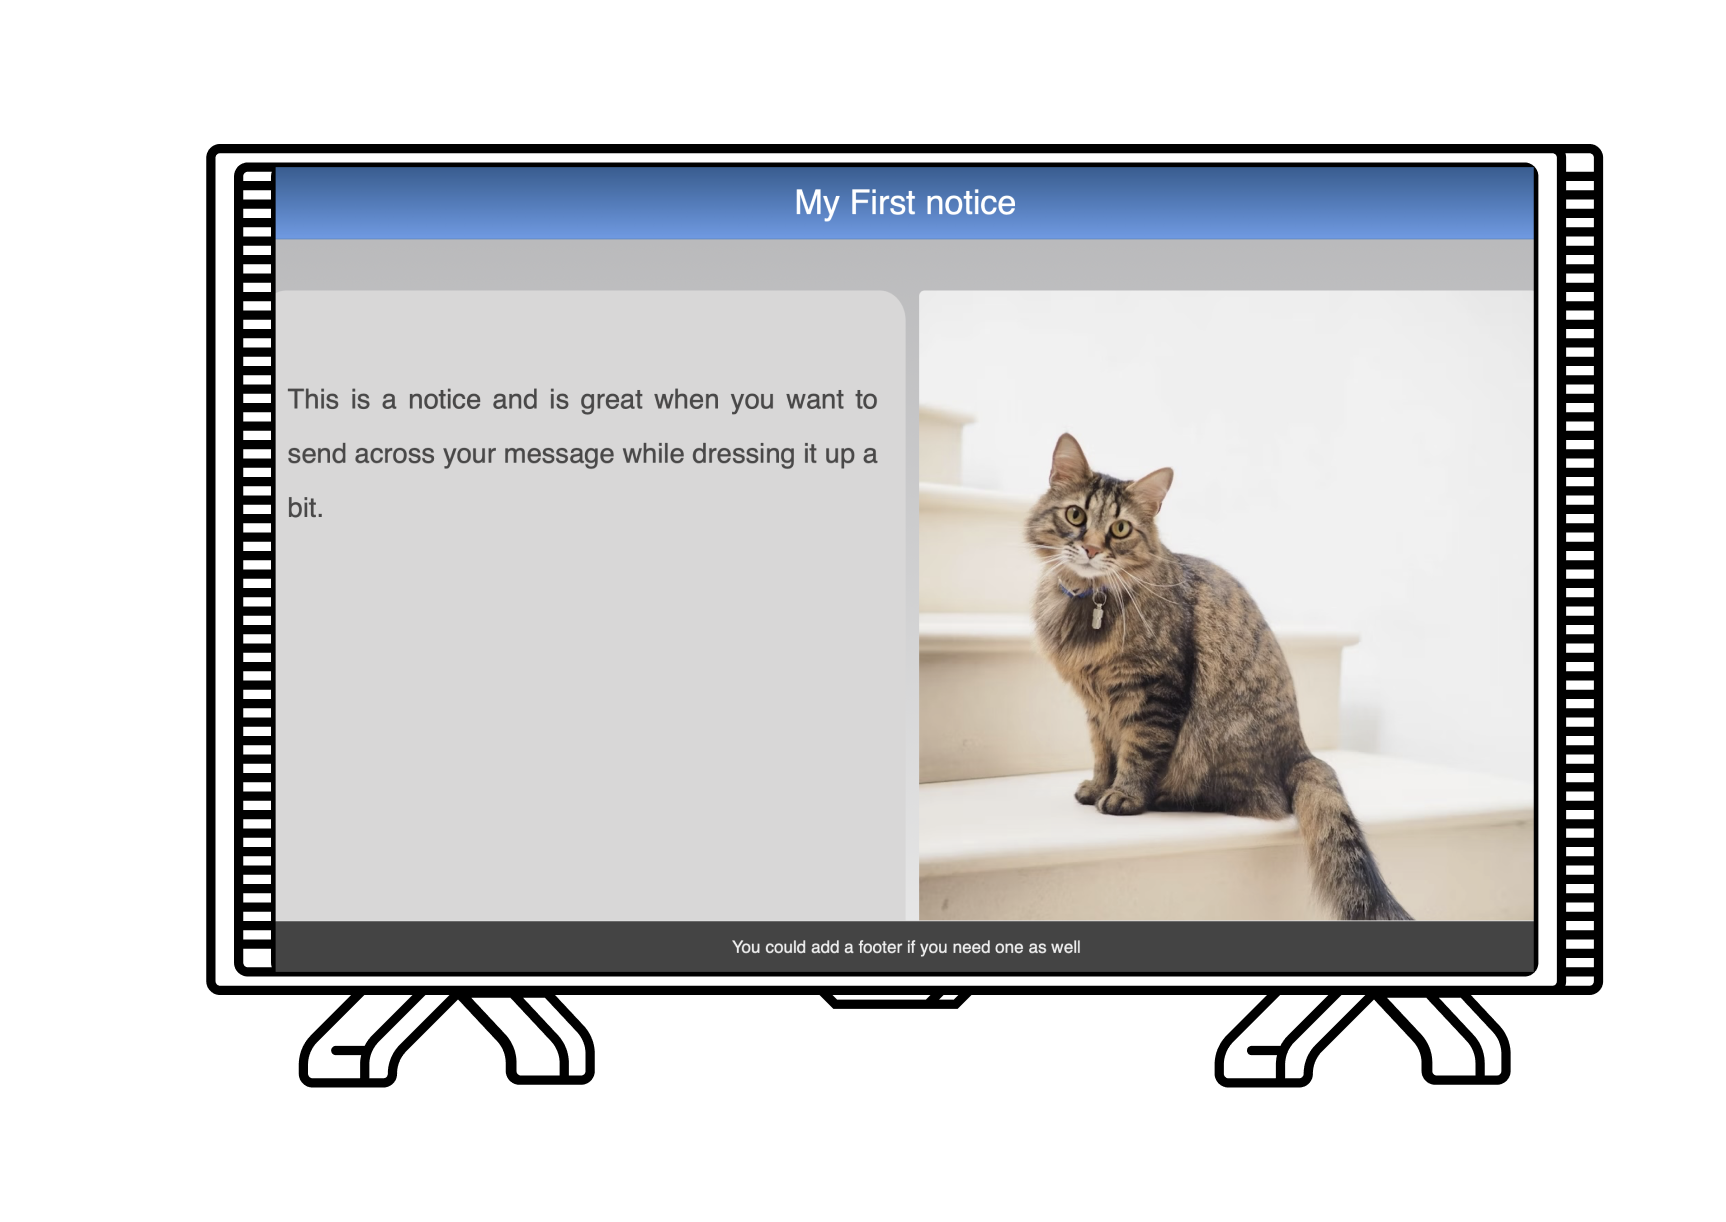
Notice
Create notices with title, body text, and optional image. Ideal for important announcements or alerts.
 It renders on a TV as shown below. You can choose to also add optional CSS value to style it as needed.
Weblink
Embeddable web page shown in an iframe. Use this for simple web content that doesn't require CORS support.
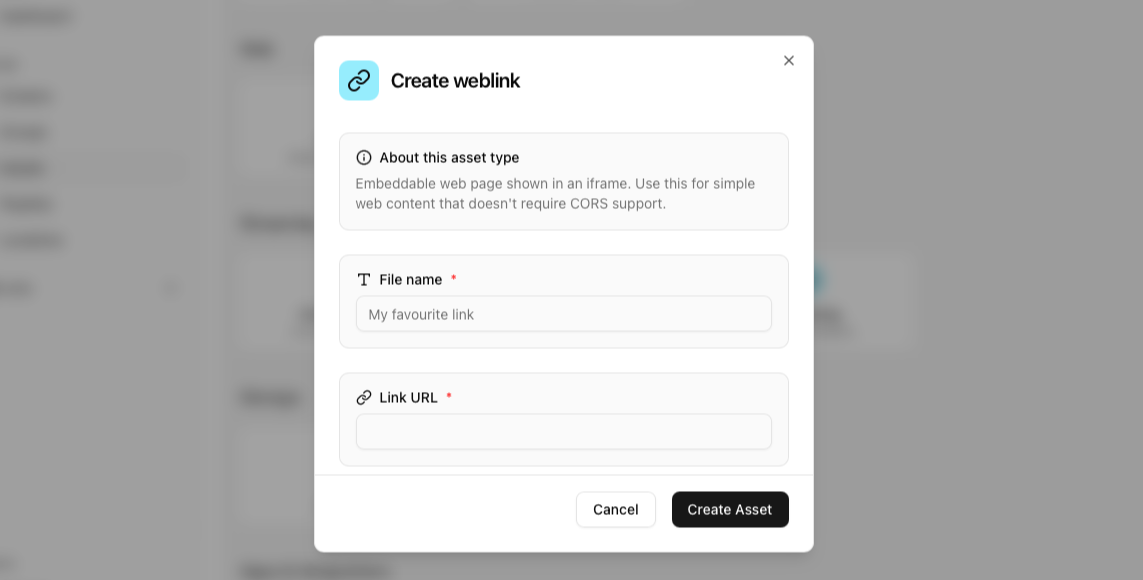 To check if your link works as a weblink or if it needs a webpage look for the preview to determine the same. if you see a red screen it indicates that you may need to use the webpage asset type for your link instead of the weblink type asset.
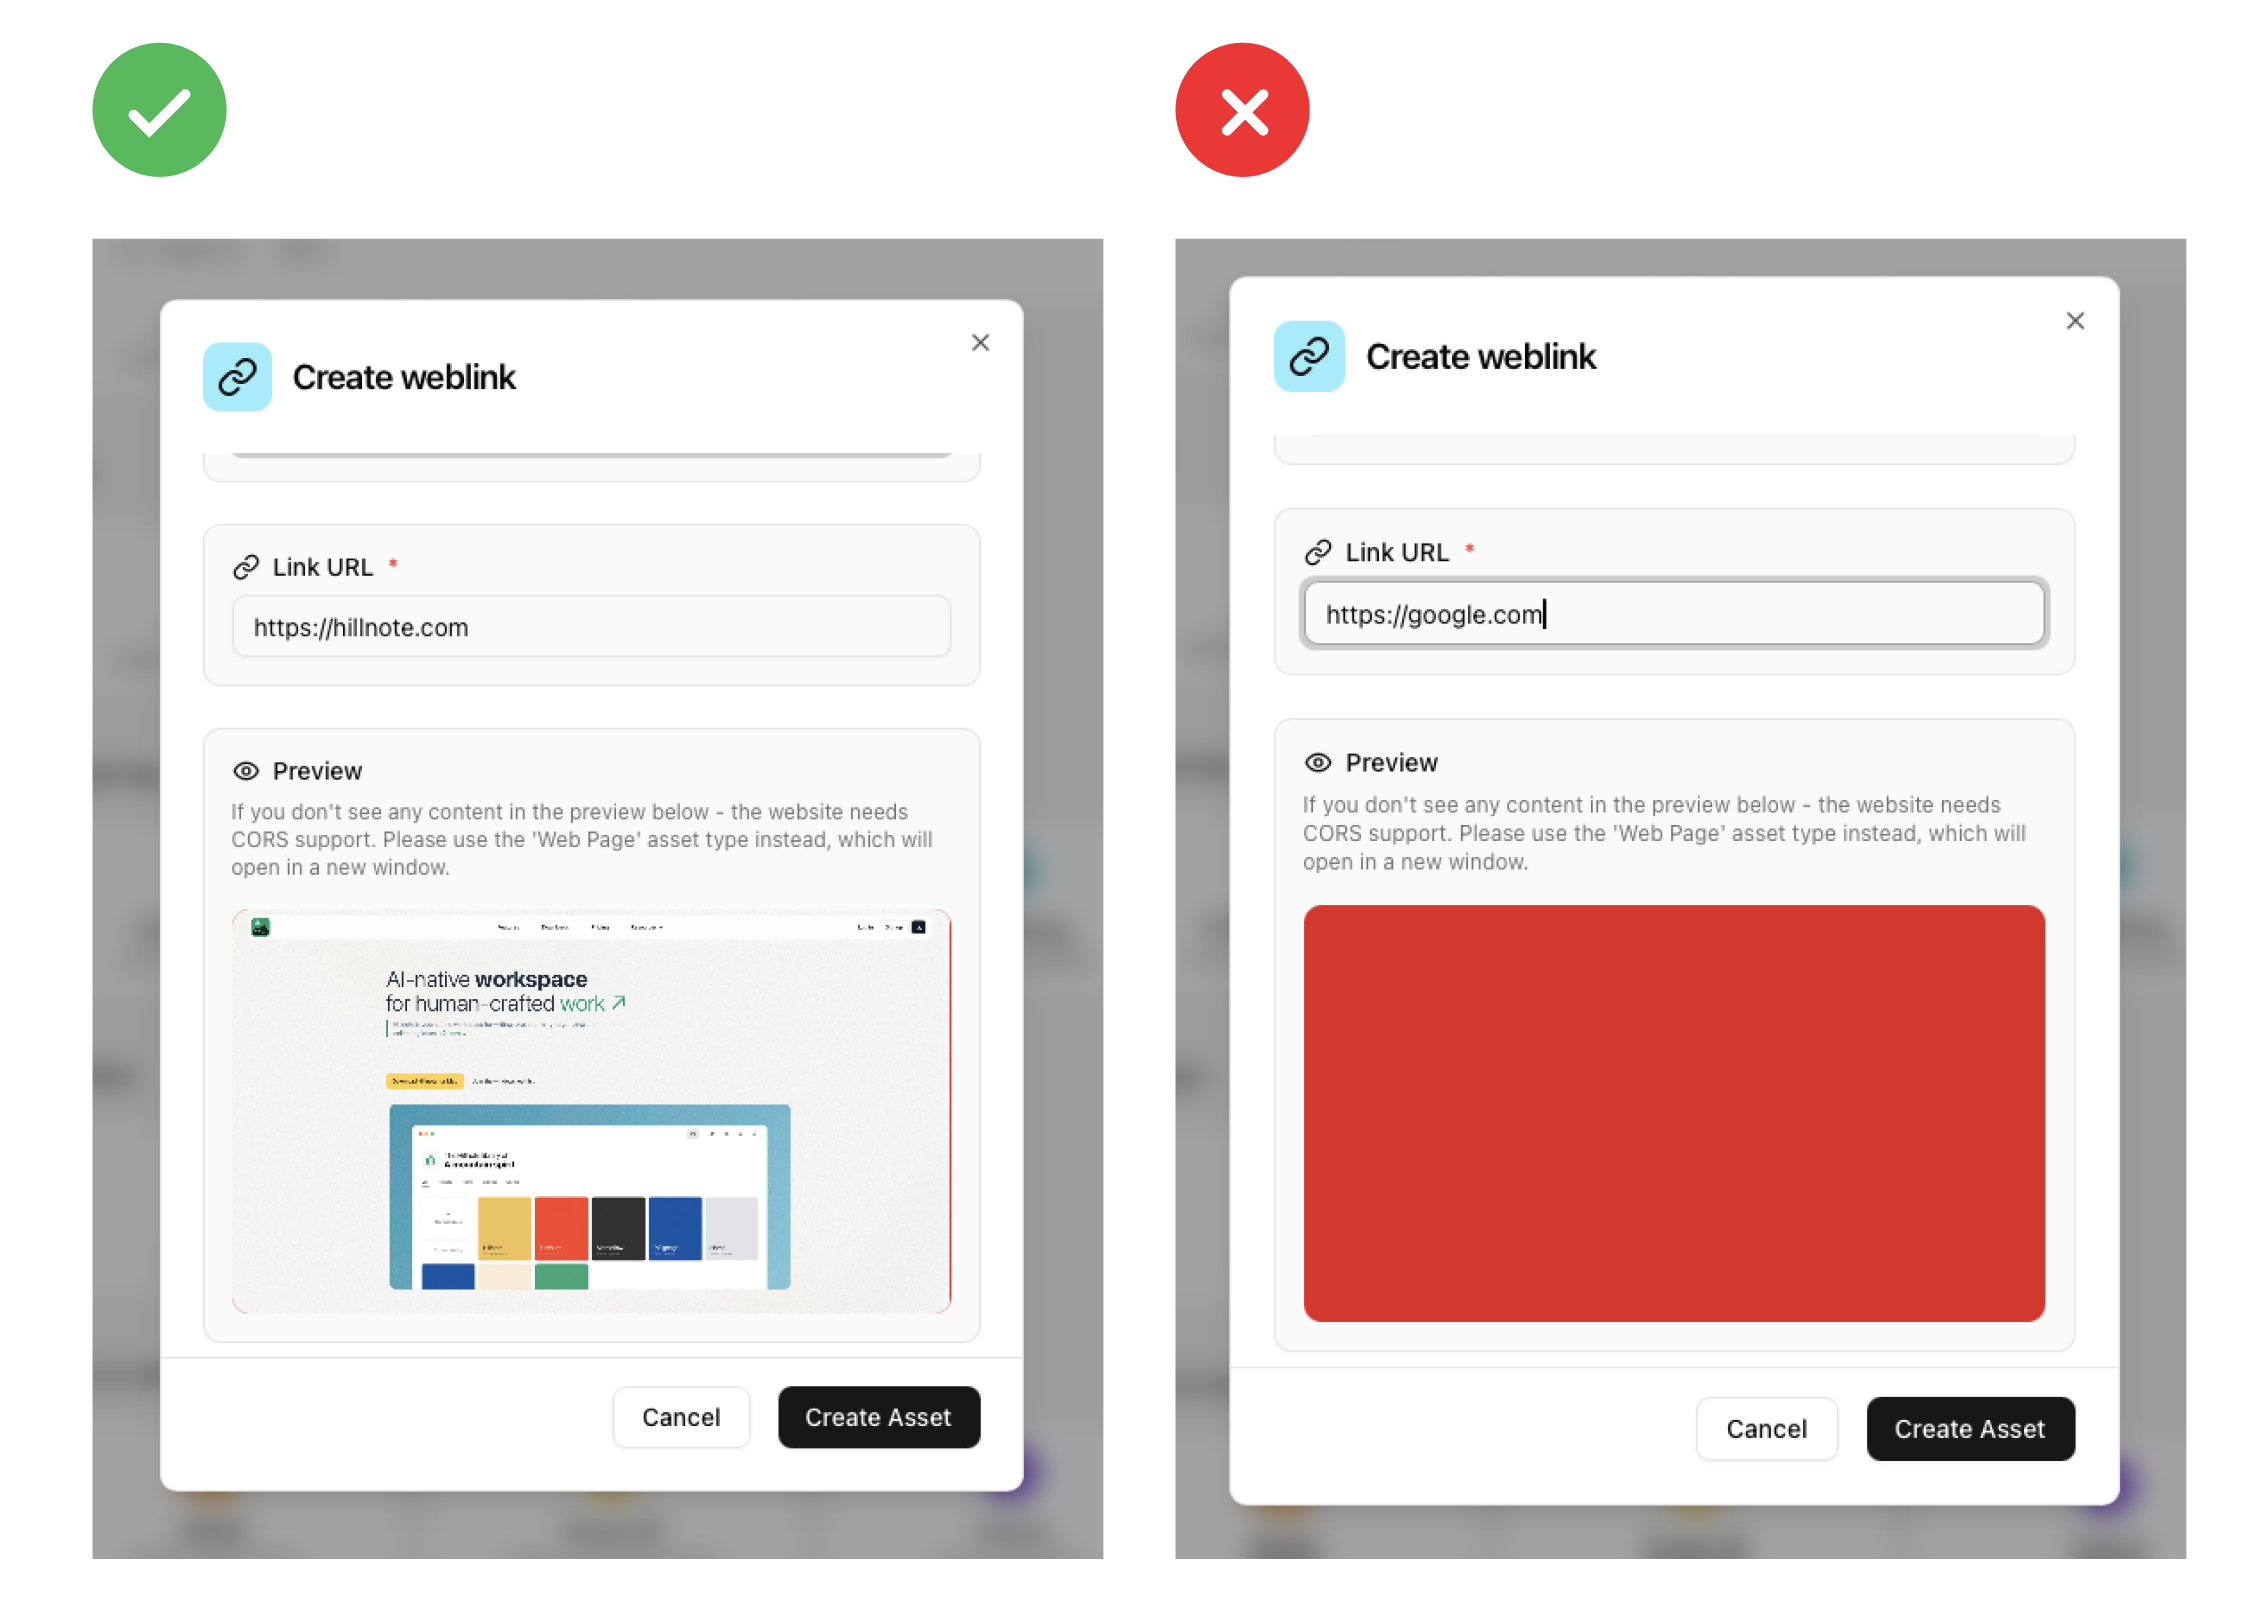
Webpage
Opens a new browser window for web content. Best for pages that require CORS support or need full browser capabilities.
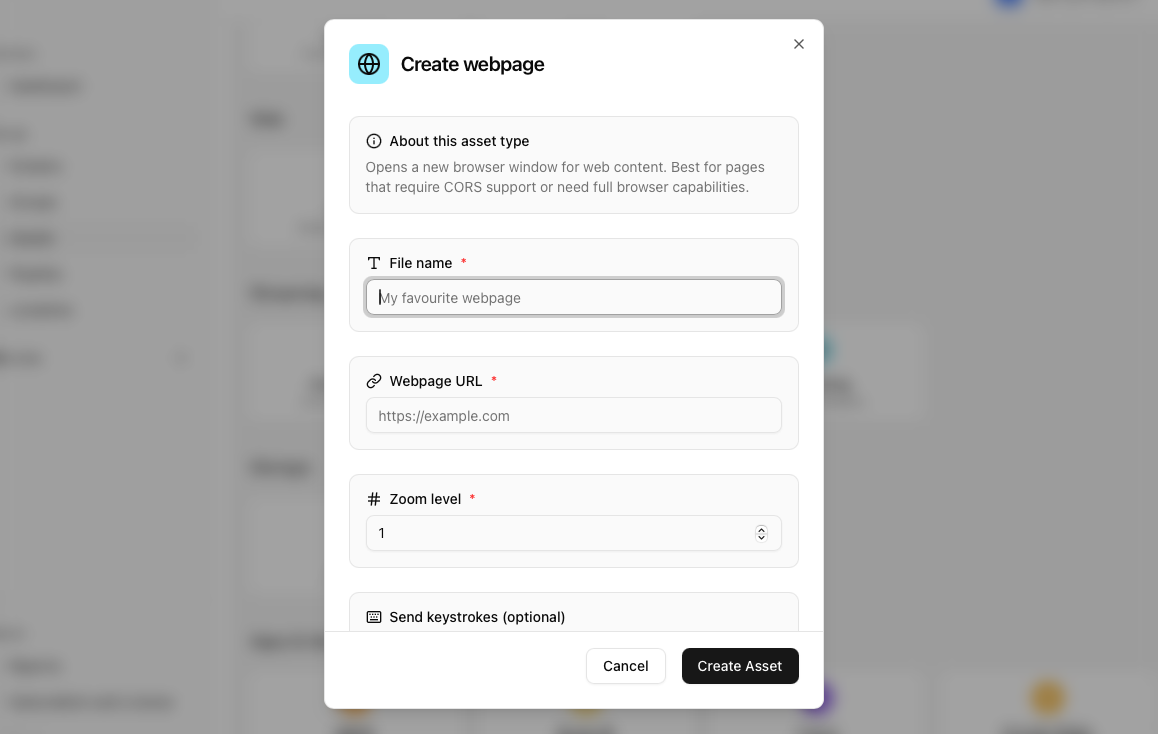 You will also see several options in this asset type
Zoom Level: Adjust your zoom level by changing the multiplier. eg: 1.2 is 1.2x the zoom level
Send keystrokes: Configure a set of keys to be pressed automatically as the page loads. Simply type the keystroke value as indicated in https://developer.mozilla.org/en-US/docs/Web/API/UI\\\\\\\\\\\\\\\\\\\\\\\\\\\\\\\\\\\\\\\\\\\\\\\\\\\\\\\\\\\\\\\\\\\\\\\\\\\\\\\\\\\\\\\\\\\\\\\\\\\\\\\\\\\\\\\\\\\\\\\\\\\\\\\\\\\\\\\\\\\\\\\\\\\\\\\\\\\\\\\\\\\\\\\\\\\\\\\\\\\\\\\\\\\\\\\\\\\\\\\\\\\\\\\\\\\\\\\\\\\\\\\\\\\\\\\\\\\\\\\\\\\\\\\\\\\\\\\\Events/Keyboard\\\\\\\\\\\\\\\\\\\\\\\\\\\\\\\\\\\\\\\\\\\\\\\\\\\\\\\\\\\\\\\\\\\\\\\\\\\\\\\\\\\\\\\\\\\\\\\\\\\\\\\\\\\\\\\\\\\\\\\\\\\\\\\\\\\\\\\\\\\\\\\\\\\\\\\\\\\\\\\\\\\\\\\\\\\\\\\\\\\\\\\\\\\\\\\\\\\\\\\\\\\\\\\\\\\\\\\\\\\\\\\\\\\\\\\\\\\\\\\\\\\\\\\\\\\\\\\\event\\\\\\\\\\\\\\\\\\\\\\\\\\\\\\\\\\\\\\\\\\\\\\\\\\\\\\\\\\\\\\\\\\\\\\\\\\\\\\\\\\\\\\\\\\\\\\\\\\\\\\\\\\\\\\\\\\\\\\\\\\\\\\\\\\\\\\\\\\\\\\\\\\\\\\\\\\\\\\\\\\\\\\\\\\\\\\\\\\\\\\\\\\\\\\\\\\\\\\\\\\\\\\\\\\\\\\\\\\\\\\\\\\\\\\\\\\\\\\\\\\\\\\\\\\\\\\\\key\\\\\\\\\\\\\\\\\\\\\\\\\\\\\\\\\\\\\\\\\\\\\\\\\\\\\\\\\\\\\\\\\\\\\\\\\\\\\\\\\\\\\\\\\\\\\\\\\\\\\\\\\\\\\\\\\\\\\\\\\\\\\\\\\\\\\\\\\\\\\\\\\\\\\\\\\\\\\\\\\\\\\\\\\\\\\\\\\\\\\\\\\\\\\\\\\\\\\\\\\\\\\\\\\\\\\\\\\\\\\\\\\\\\\\\\\\\\\\\\\\\\\\\\\\\\\\\\values with
,to seperate the sameDelay for sending keystrokes: Choose the number of seconds before the keystroke values configured in (2) are sent. Great when you want to ensure the page fully loads, etc.
Auto Scroll: Auto scrolls until the end of the page
Optional headers: Use this if you have authorisation, prefills, values, etc that need be sent via the URL header
Weblinks vs Webpages → An explanation
Weblinks are links opened in iframe that is embeded in the current instance of the browser. This would make it fairly gapless with the previous content and reduce load time.
Webpages on the other hand open a new window in a new browser instance and load the page which while more powerful does impact how seamless all of it is.
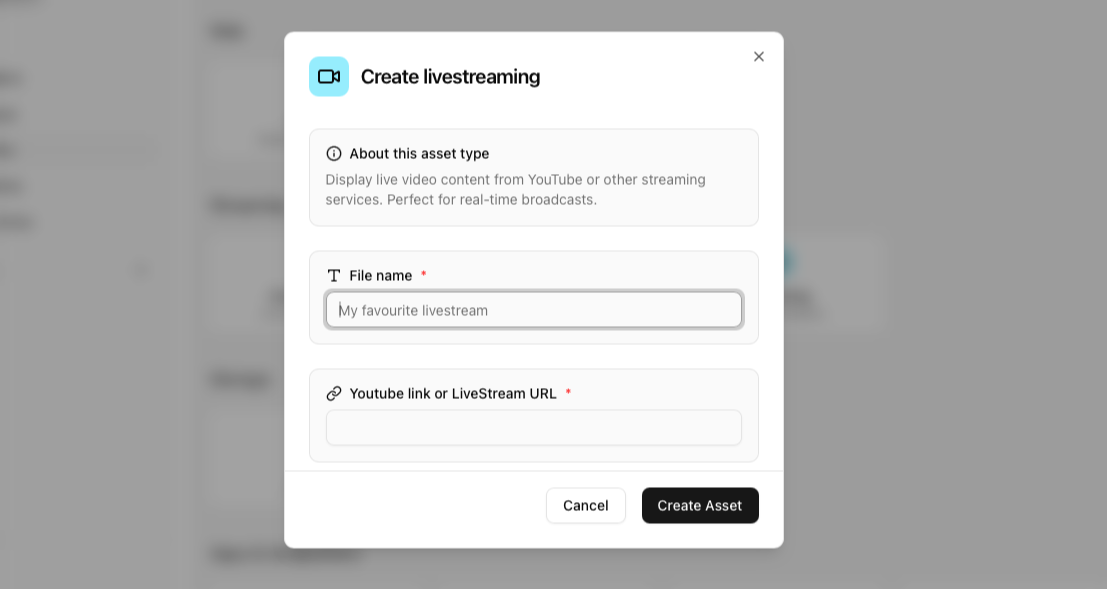
Livestream
Display live video content from YouTube or other streaming services. Perfect for real-time broadcasts.
Any stream can be played as long as it follows the RTSP protocol (reference: https://developer.mozilla.org/en-US/docs/Glossary/RTSP)
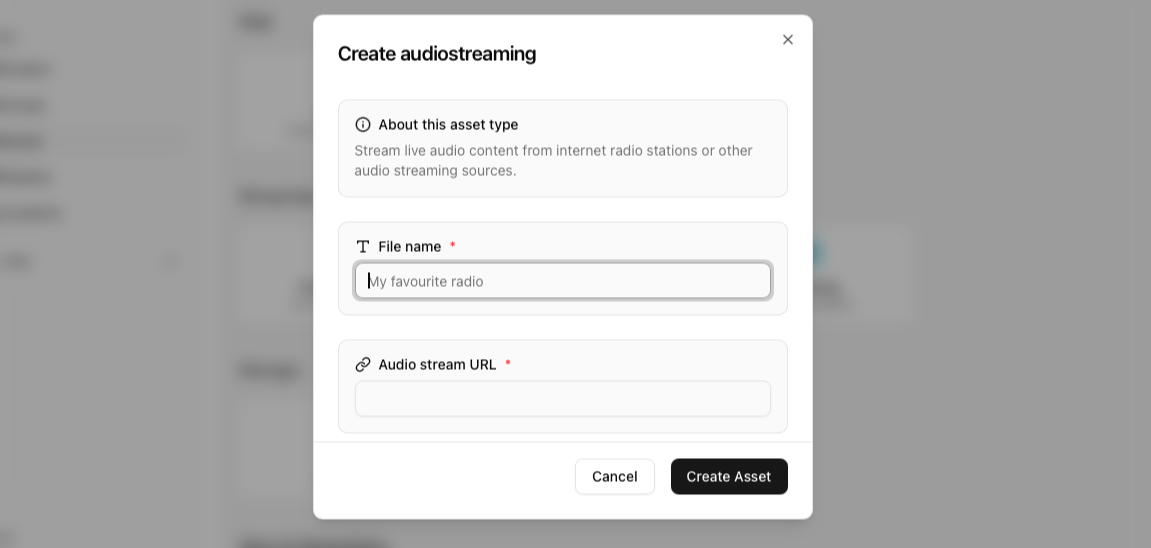
Audio Stream
Stream live audio content from internet radio stations or other audio streaming sources.
PROTIP: Its a great source especially when you want this audio playing in the background as defined in Playlists
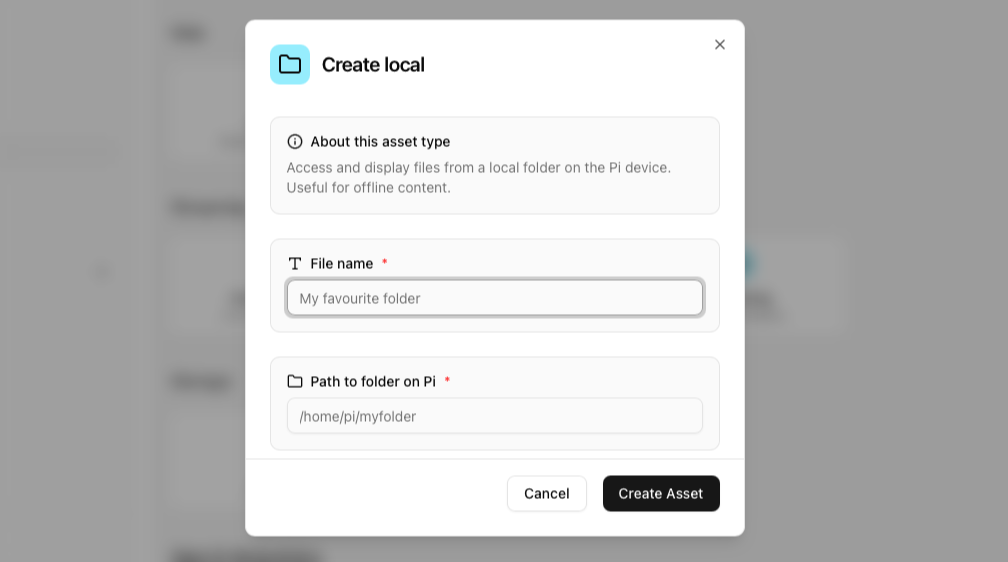
Local Files and folders
Access and display files from a local folder on the Pi device. Useful for offline content. This is great especially when you have a large set of files to choose from and you do not want to transfer them via the internet to save on data transfer charges.
Apps and integrations
We do have a wide array of apps and integrations which can help bring your content from elsewhere straight to your screen.
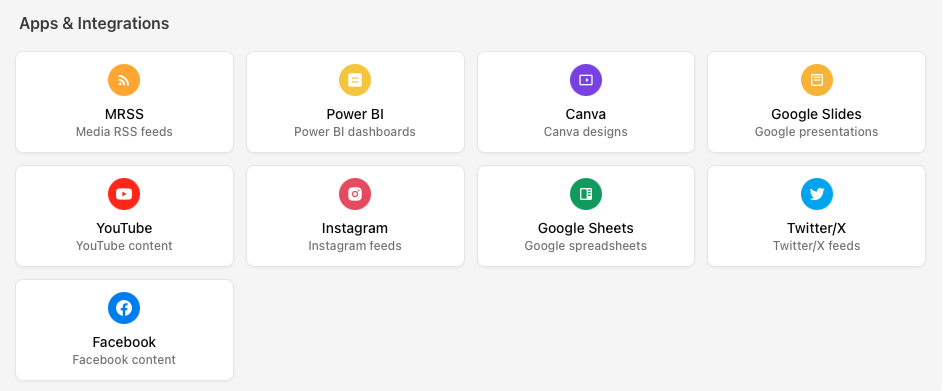
Media RSS
Display dynamic content from Media RSS feeds. Great for automatically updating content like news, images, or announcements.
You will also see several options in this asset type
Media RSS link: The RSS link available on most websites and News Sources
RSS Type: Choose what you would like to load from the RSS
Number of Items: How many items would you like to load. This loads the items by most recent.
Duration: Duration that each item will show
Optional CSS: CSS to alter the styling of the asset
Below is an example of how this asset shows with Image + title selected and the Wired, Culture RSS feed.

Power Bi
To Show your Power BI dashboard, Some setup actions need to be done in Azure Portal and Power BI Admin Portal.
Ensure you are using the same user account on both to login. An Entra app has to be set up in Azure Portal as the service principal. Then, an app secret must be created for the same app. The user account of PowerBI must have Power Administrator rights.
The account needs to enable service principal access to Fabric APIs (no Fabric license necessary, only PowerBI license will do) in the Power BI admin portal.
Add or create PowerBI reports in a Power BI Workspace. Add Entra app in the Power BI workspace "Manage Access" area.
Get the Workspace ID and Report ID from the URL of the Power BI report/dashboard.
https://learn.microsoft.com/en-us/power-bi/developer/embedded/embed-sample-for-customers?tabs=node-js is a great resource to refer to.
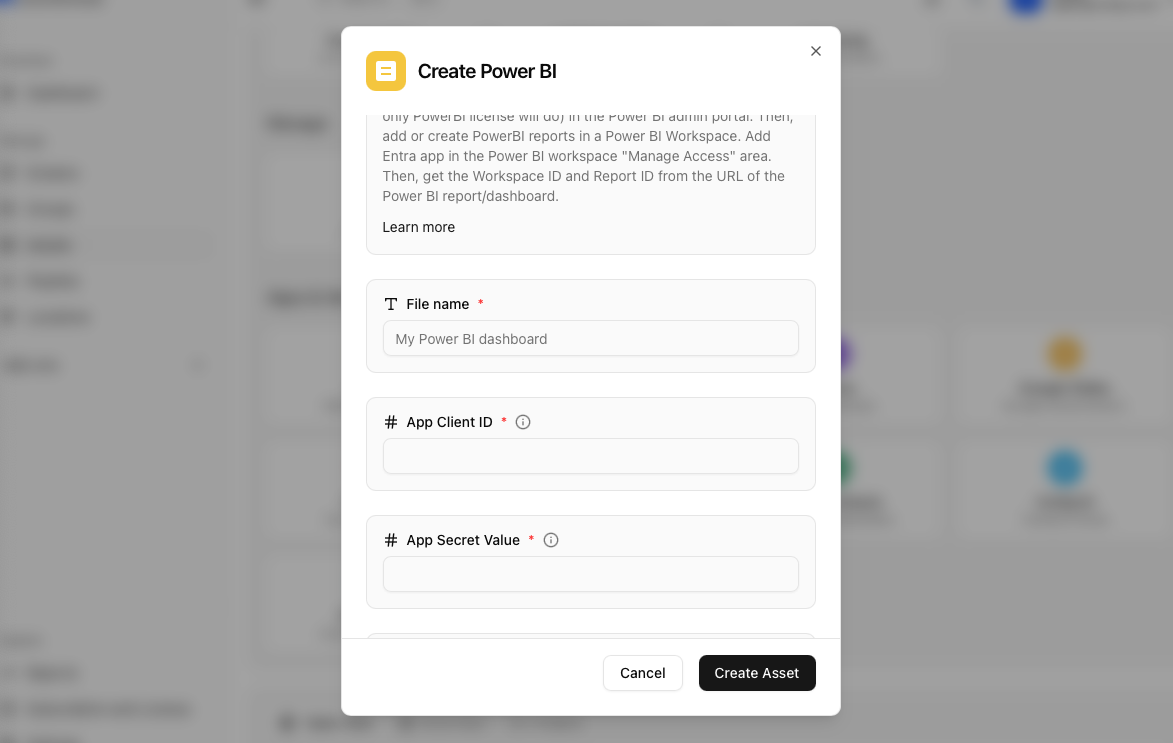 You can then proceed to fill in each of the field values by clicking the ‘i’ icon to know where to fetch the value from.

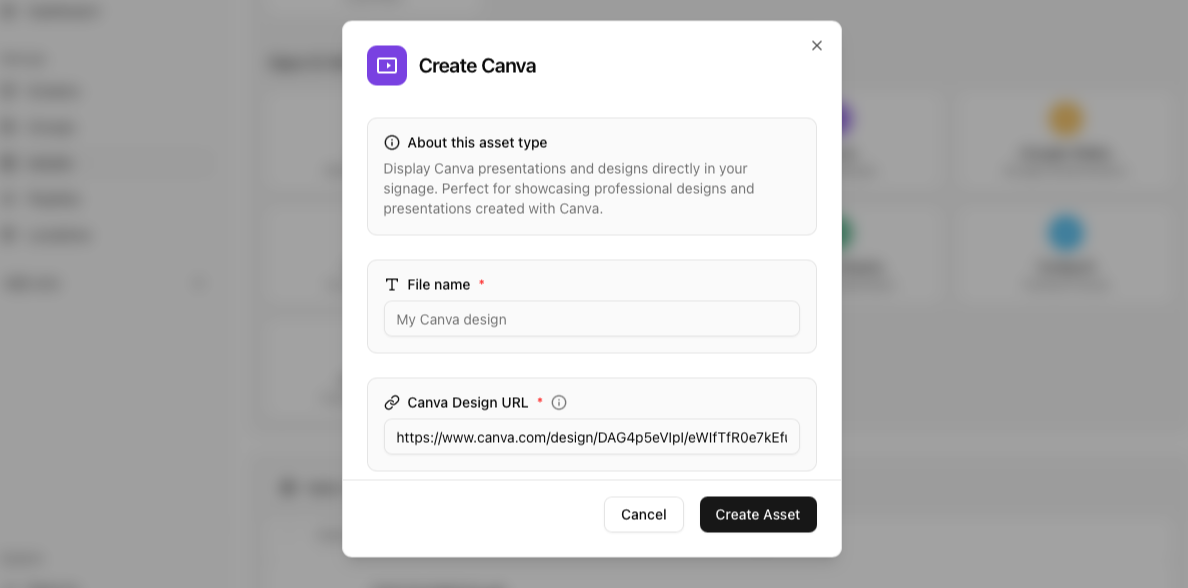
Canva
On Canva create a public view link and use the same link to create your asset.
This is a variant of the Webpage asset type as Canva links require CORS support
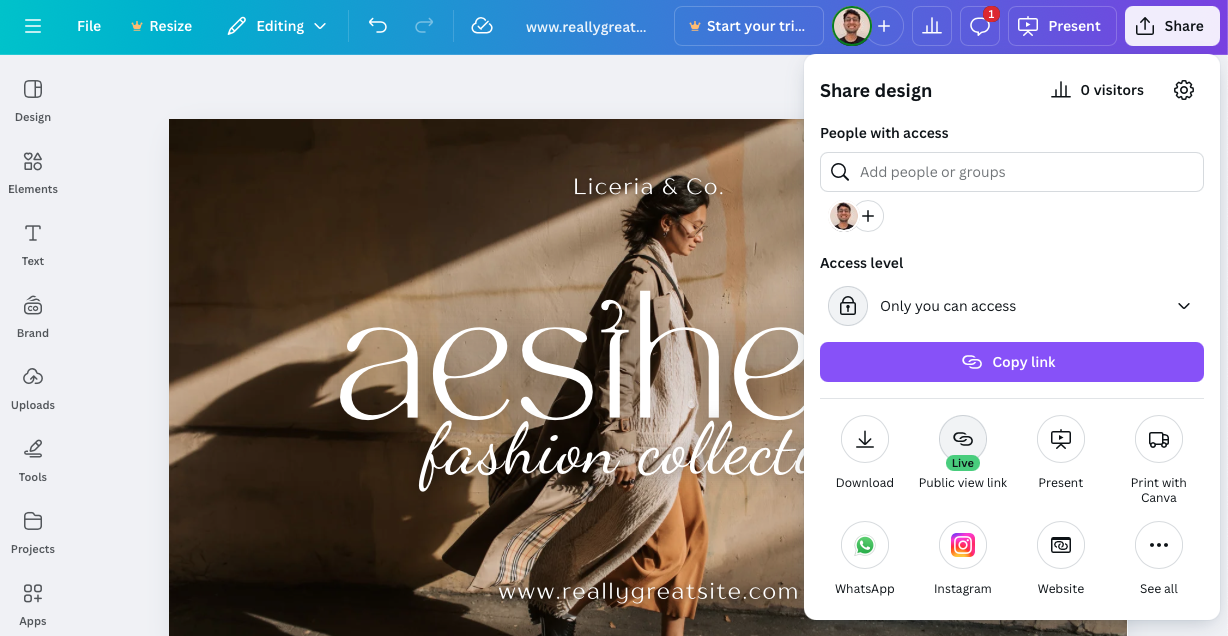
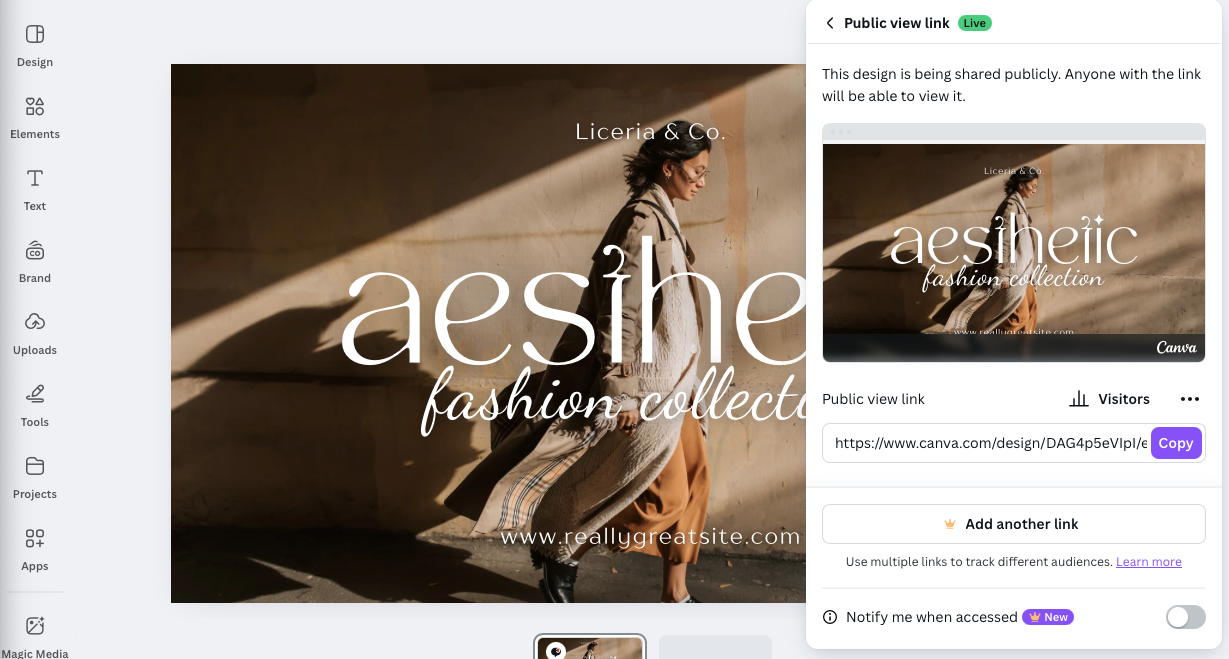 Once you create the link, paste the same in the dialog.
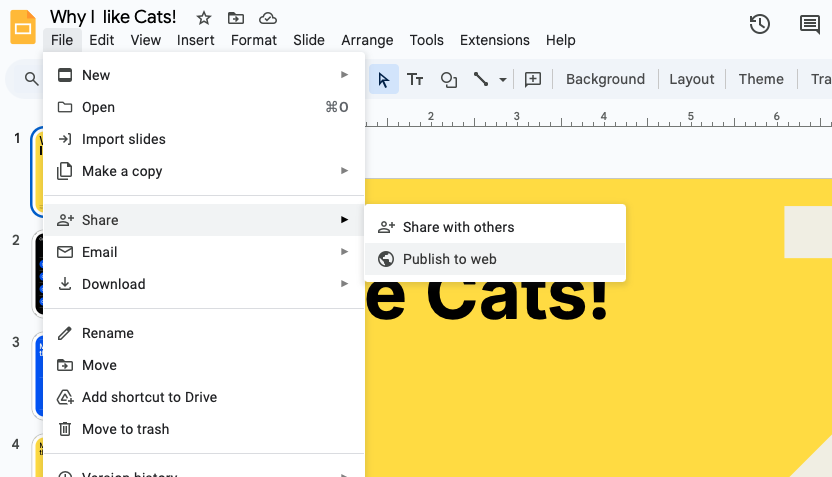
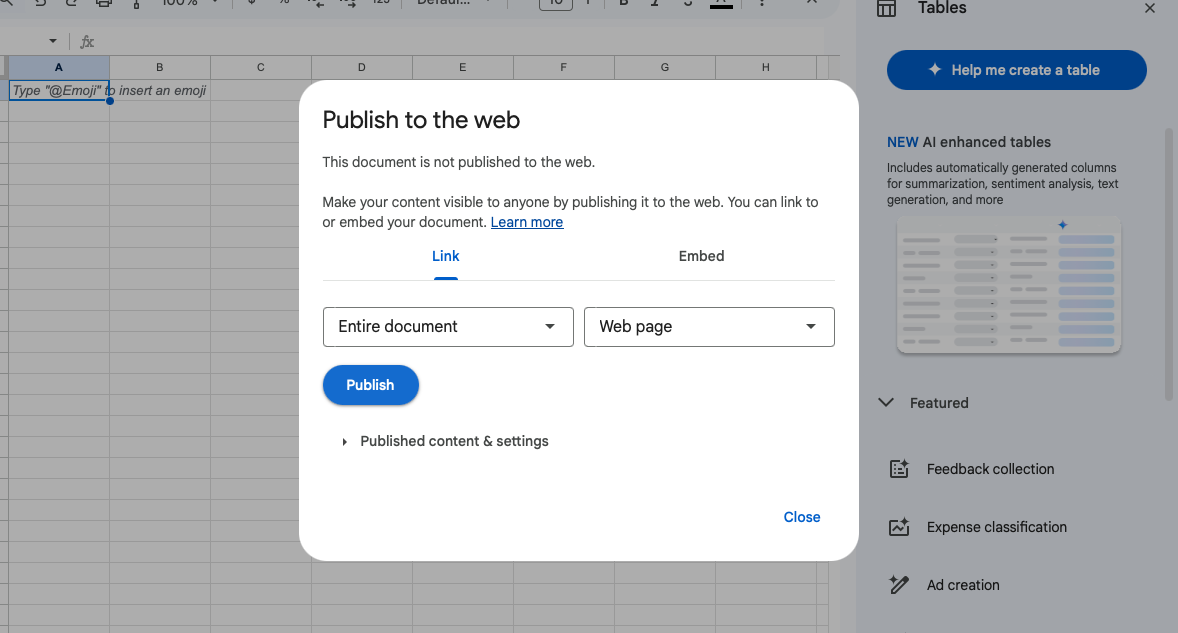
Google Slides
You need to publish your slideshow to share slideshows from Google Slides, please click on
File > Share > Publish to the web
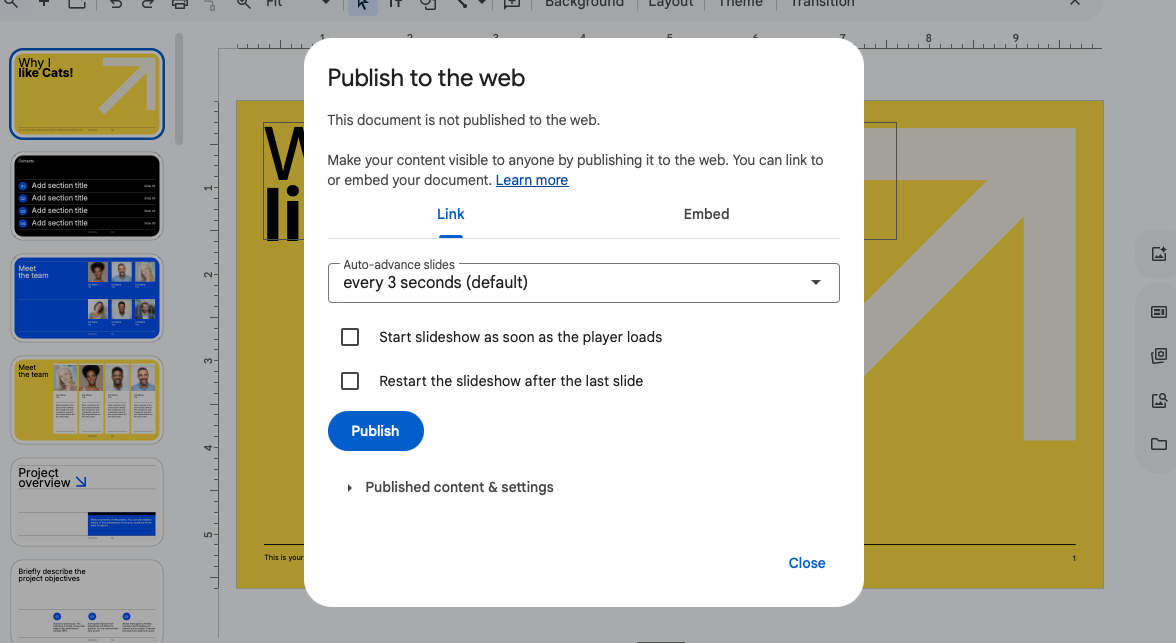 Once you click publish you should receive the link.
 Once published use the link generated here to use the Google slideshow.
PS: All settings on duration per slide, transitions, etc are handled by google slides and have to be configured on the platform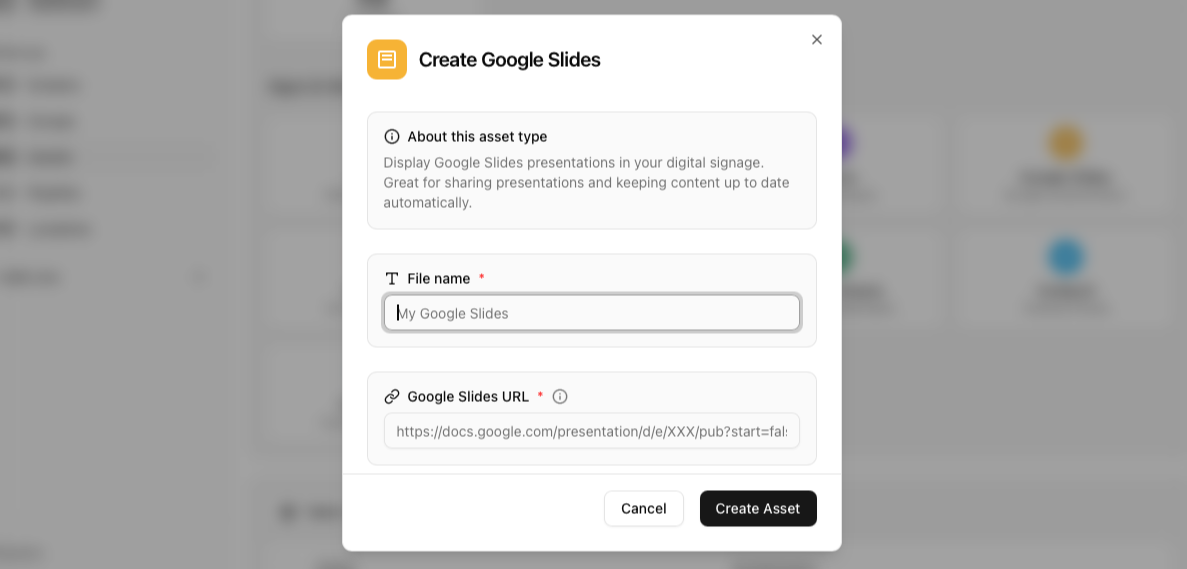
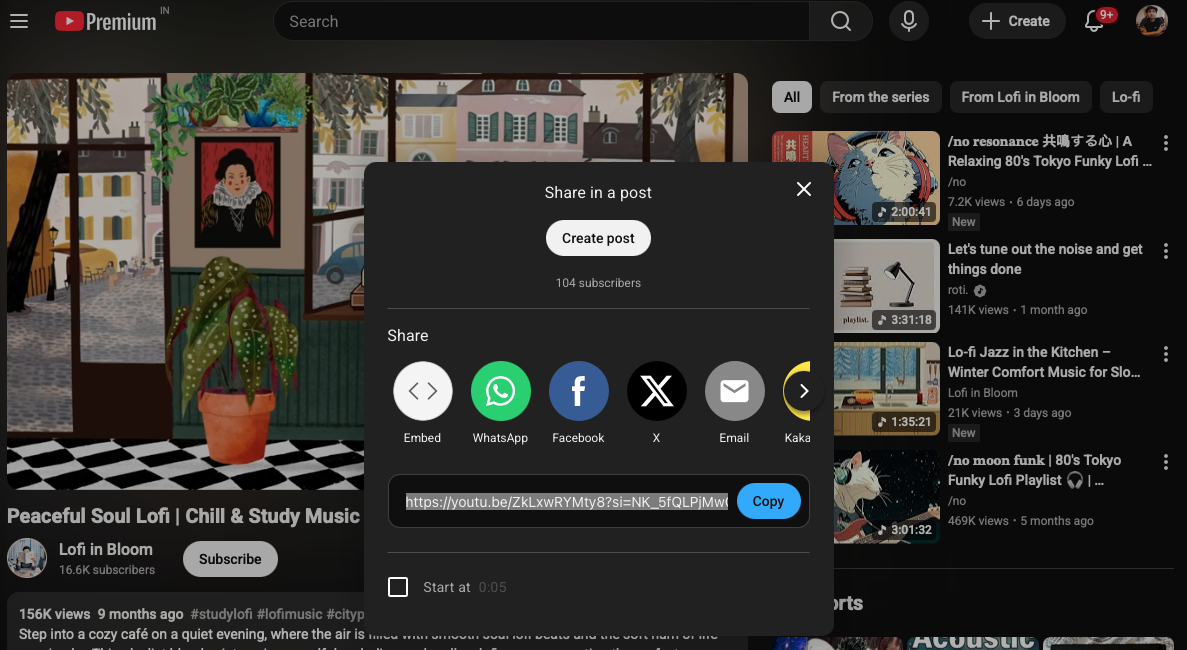
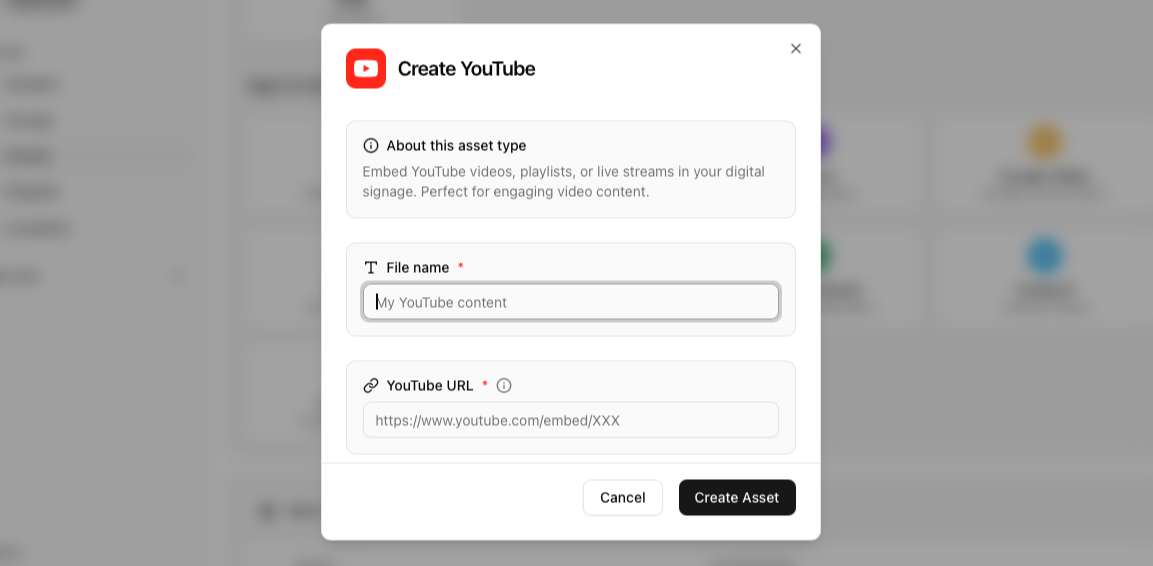
Youtube
To add a youtube video just copy the share link in the video and paste the same in PiSignage.
Do make sure to use the share link and NOT the URL from your browser
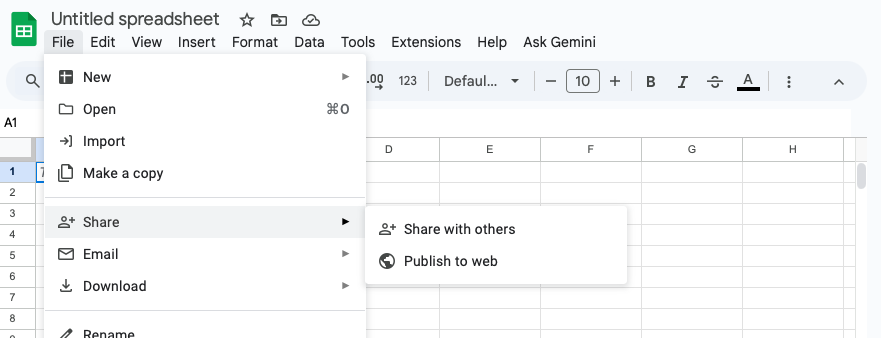
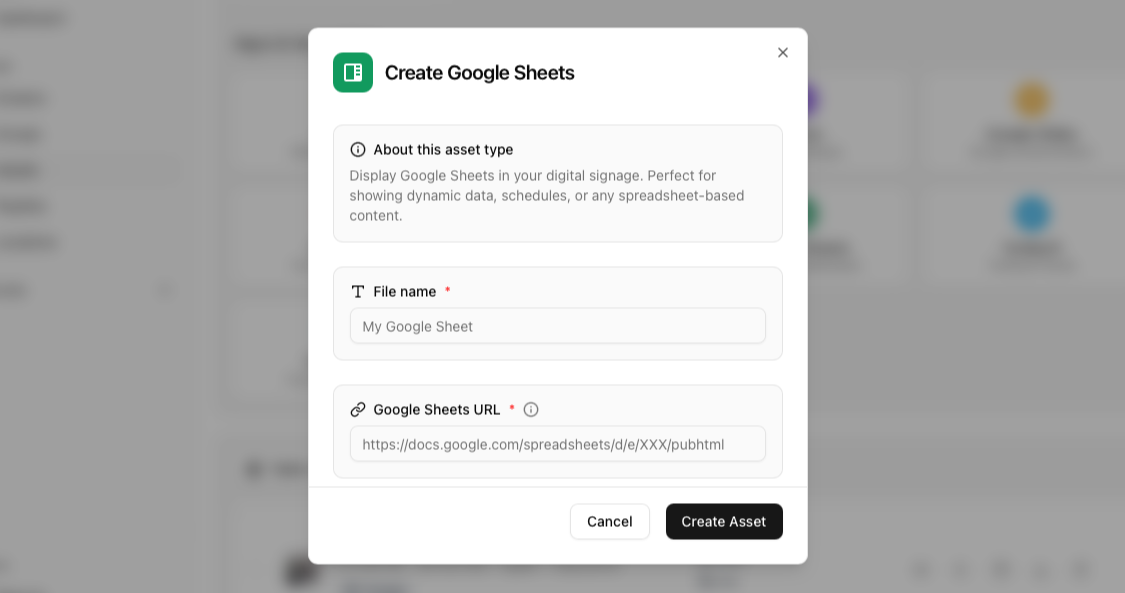
Google Sheets
Display Google Sheets in your digital signage. Perfect for showing dynamic data, schedules, or any spreadsheet-based content.
You need to publish your Spreadsheet to share Sheets from Google Sheets, please click on
File > Share > Publish to the web
 Once you click publish you should receive the link.
 Once published use the link generated here to use the Google Sheets.
PS: All settings are handled by google sheets and have to be configured on the platform
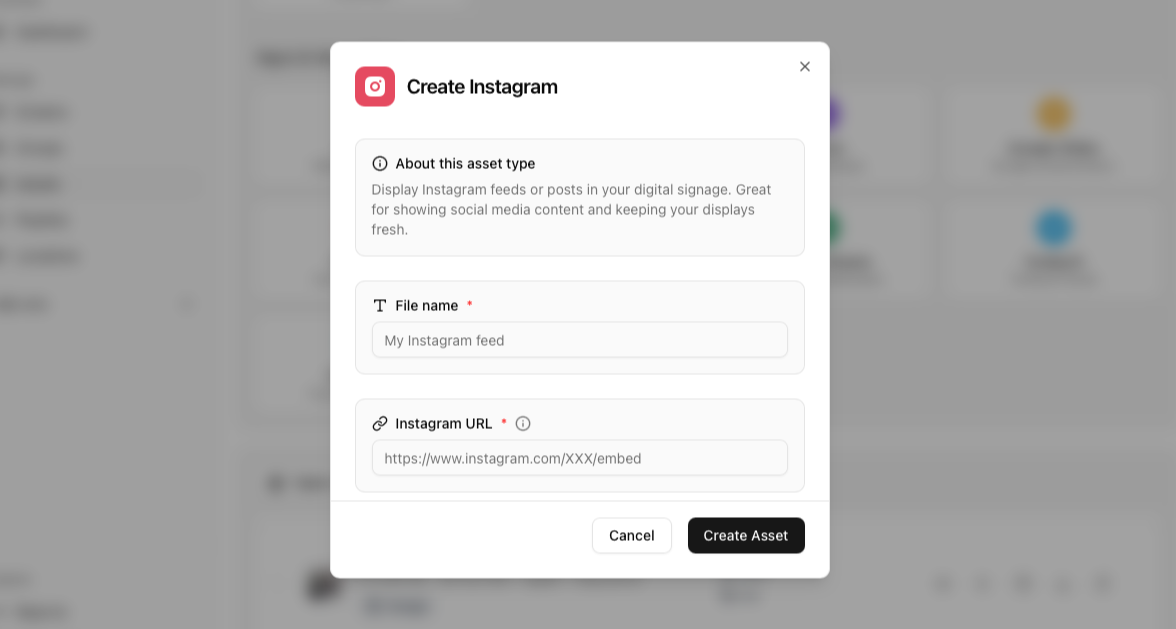
Display Instagram feeds or posts in your digital signage. Great for showing social media content and keeping your displays fresh.
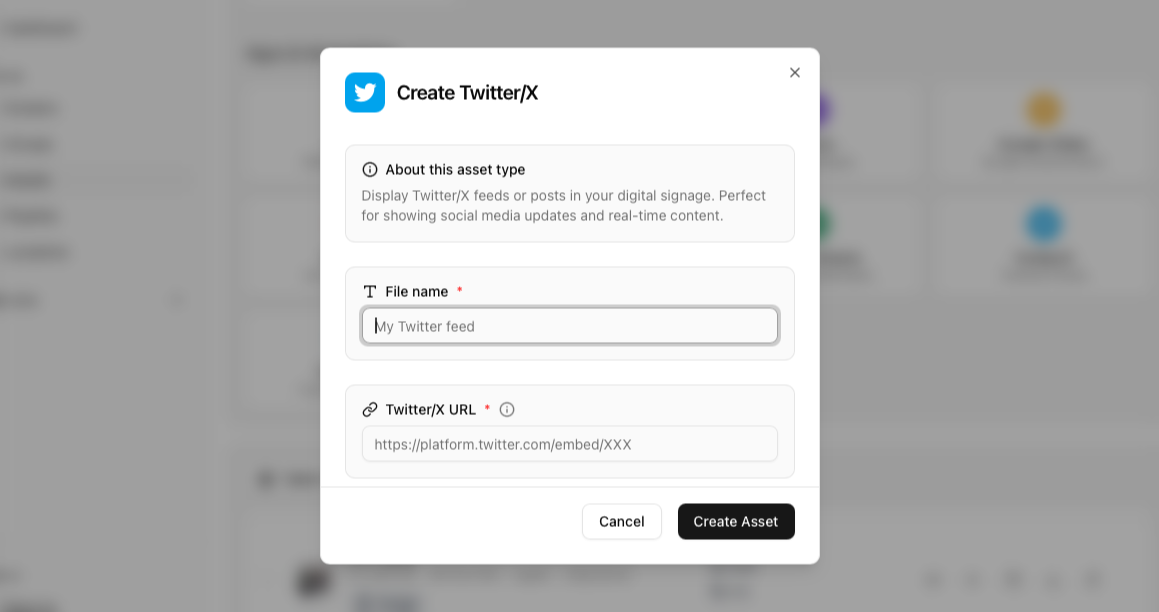
Twitter/X
Display Twitter/X feeds or posts in your digital signage. Perfect for showing social media updates and real-time content.
Display Facebook pages or posts in your digital signage. Great for showing social media content and community engagement.

Appstore (Coming soon)
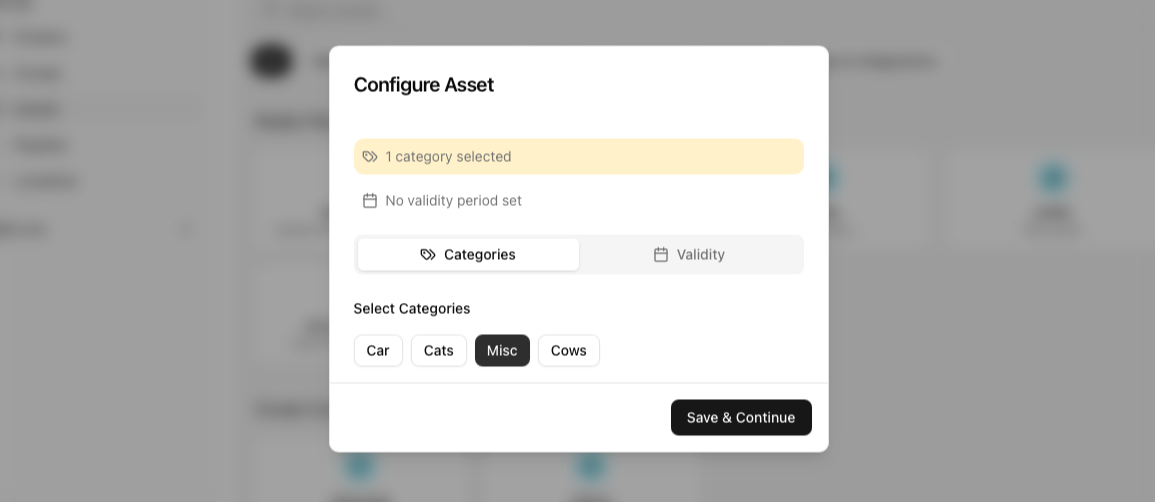
Step 2 → Assigning validity and categories
Once you upload your asset you should see a dialog to help add categories and validity to your uploaded asset(s).
Categories
Categories are tags that help organise and categorise your assets. They are present throughout the platform (even in playlists, groups, etc) to help categorise everything. Adding categories is as simple as clicking the relevant category to apply the same.
 You can find more information on categories in the Categories page.
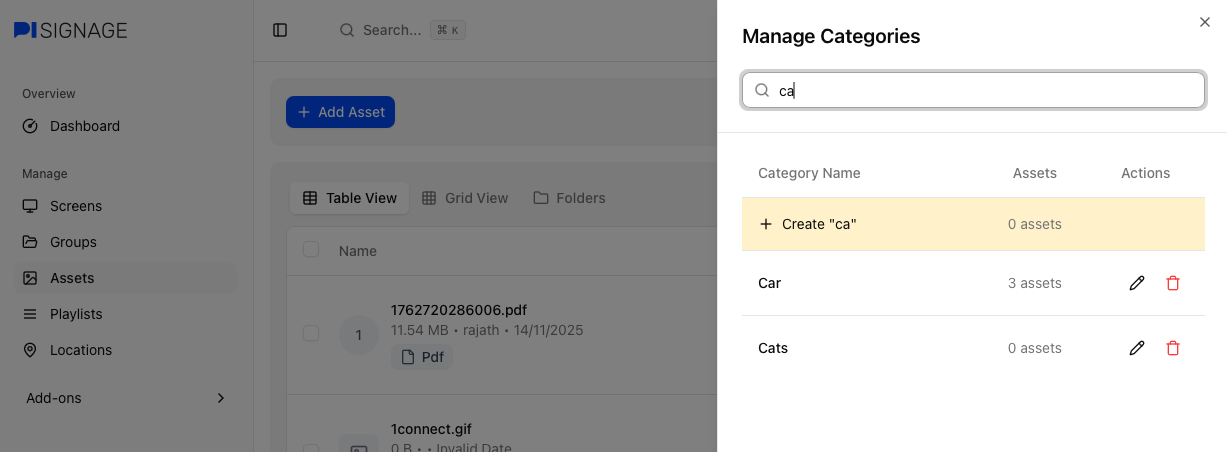
Add and manage categories
You can add, edit or delete categories by clicking on the manage categories button
 This should open the Manage category menu.
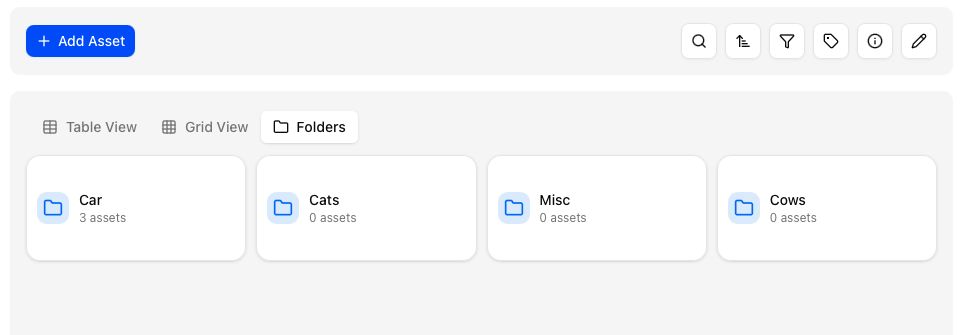
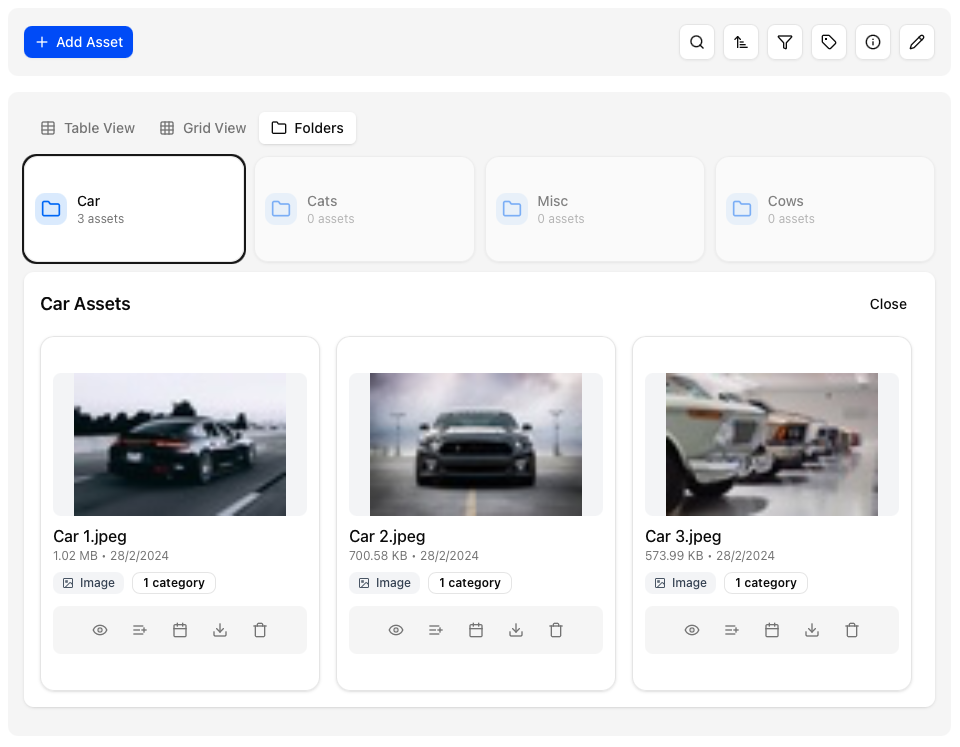
Category view
By clicking on folders, you can view your assets as organized by the category they belong to. Categories is a great way to organise and filter through your assets.
Validity
Validity is used to determine if the asset is fit to play. By default all assets have no validity assigned to them. However if you assign either a start date or end date then the asset will not play on any date/time outside of the validity period.
This is a great option for limited time offers, etc.
 Validity also appears in the asset list with tags to help identify what has expired, valid, etc
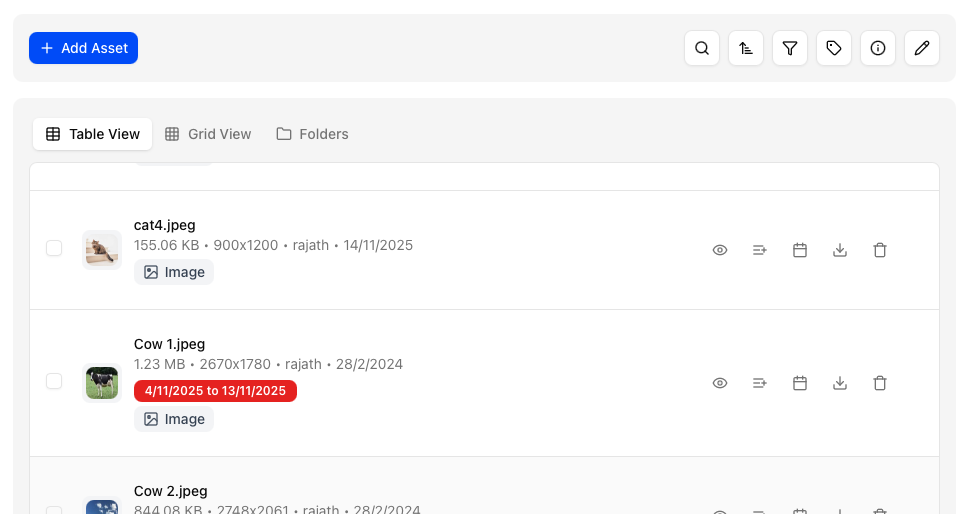 The example above is of an expired asset.
Renaming an asset
To rename an asset click on the pencil icon
 Once you click the same, all asset names will become editable. Click on the check icon to save your changes or the ‘x’ icon to discard them.
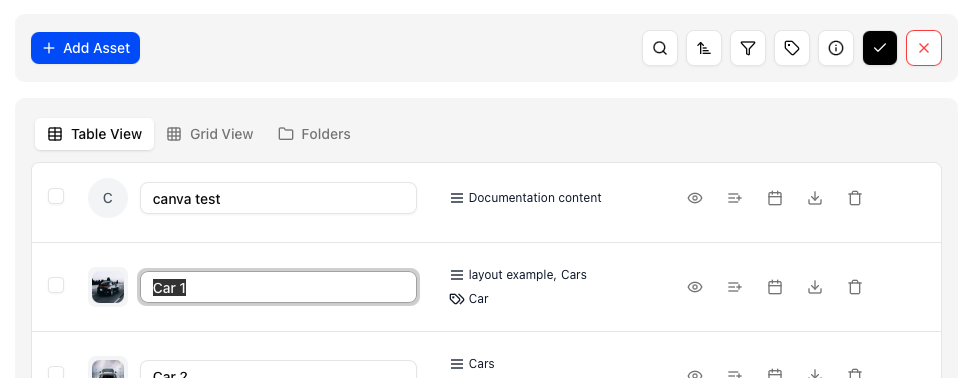
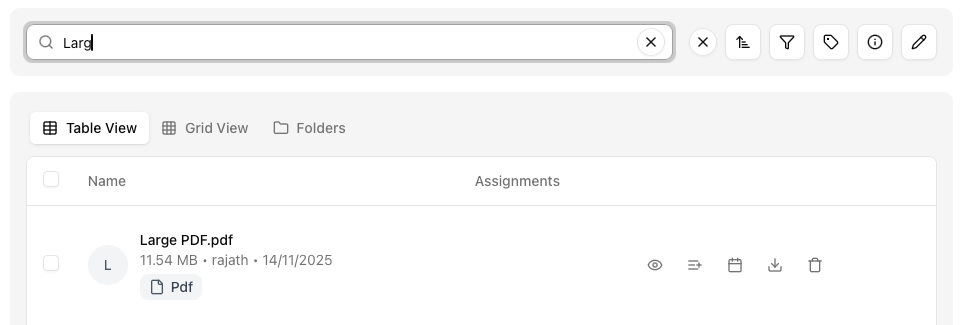
Search and filter
Search
Click on the search icon to filter through your assets
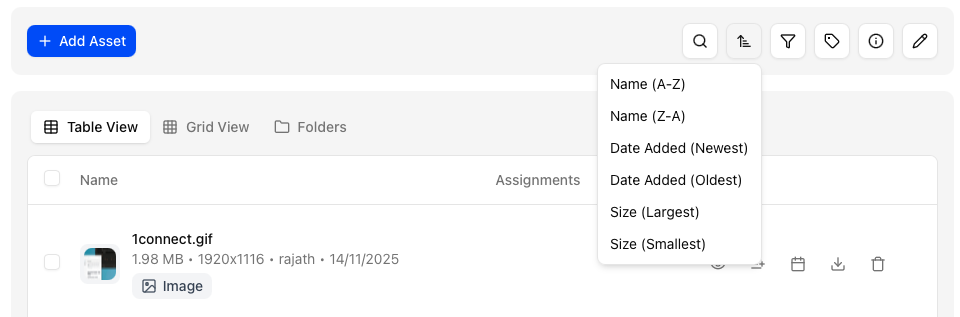
Sort
You can sort your assets in any order by toggling the sort options
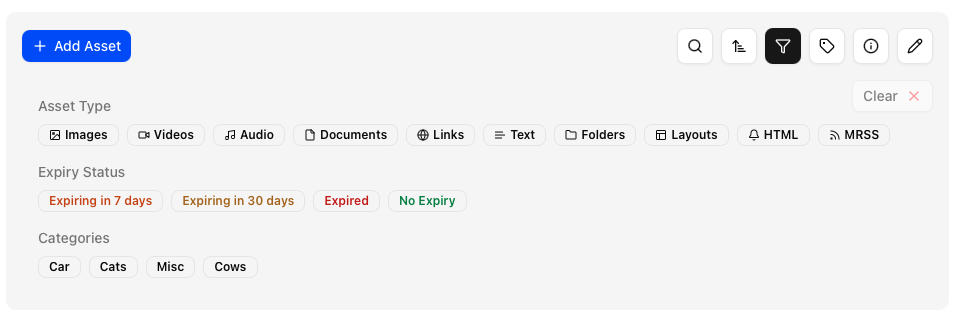
Filter
Filter through your assets by opening the filter dialog by clicking on the filers. You can choose any combination of filters below:
Asset type
Validity
Categories
Views
The assets page has 3 distinct views accessible in the 3 tabs below.

Table view
All assets as a table to get the maximum amount of information on any asset.

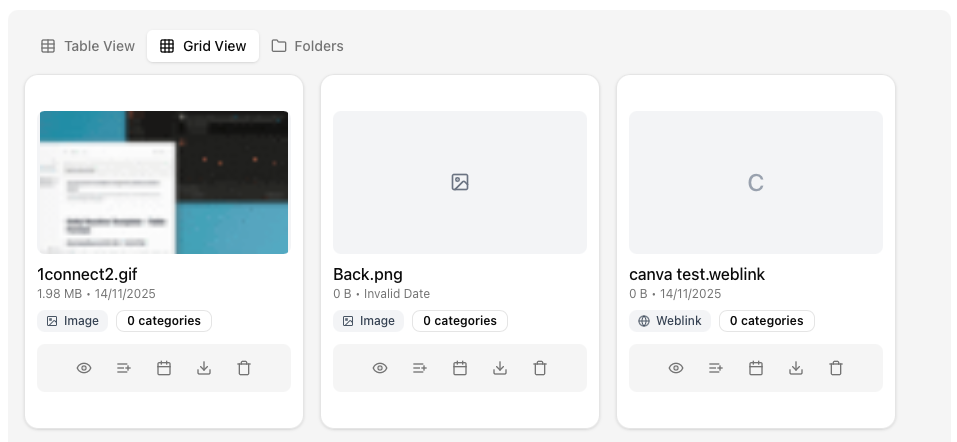
Grid view
All assets can be viewed as tiles. Great when you rely on the asset preview
Folder view
Here the assets are grouped together by categories into folders. This is great for a more native file manager view.
Asset actions
Each asset has a few actions associated with the same.
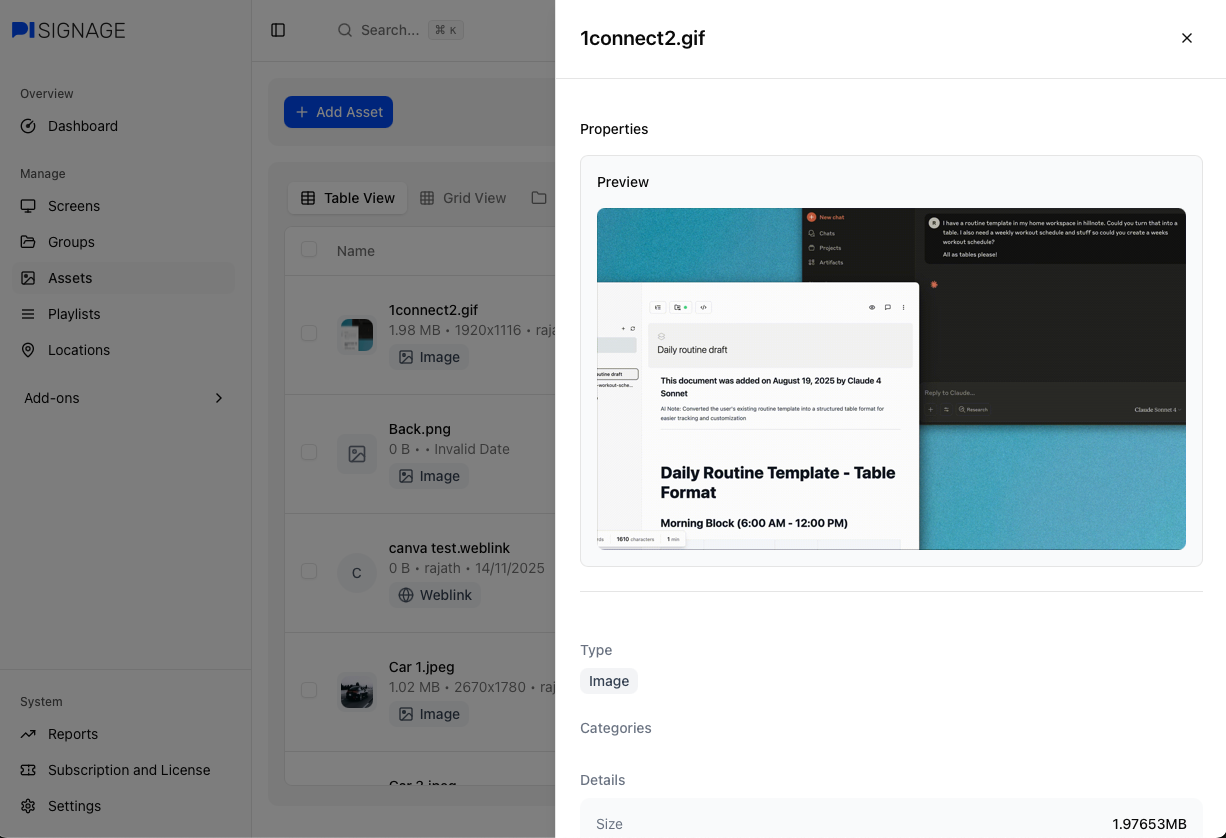
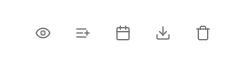 View asset
Click on the 👁️ icon to view the asset, with both a preview and details on the asset specifications.
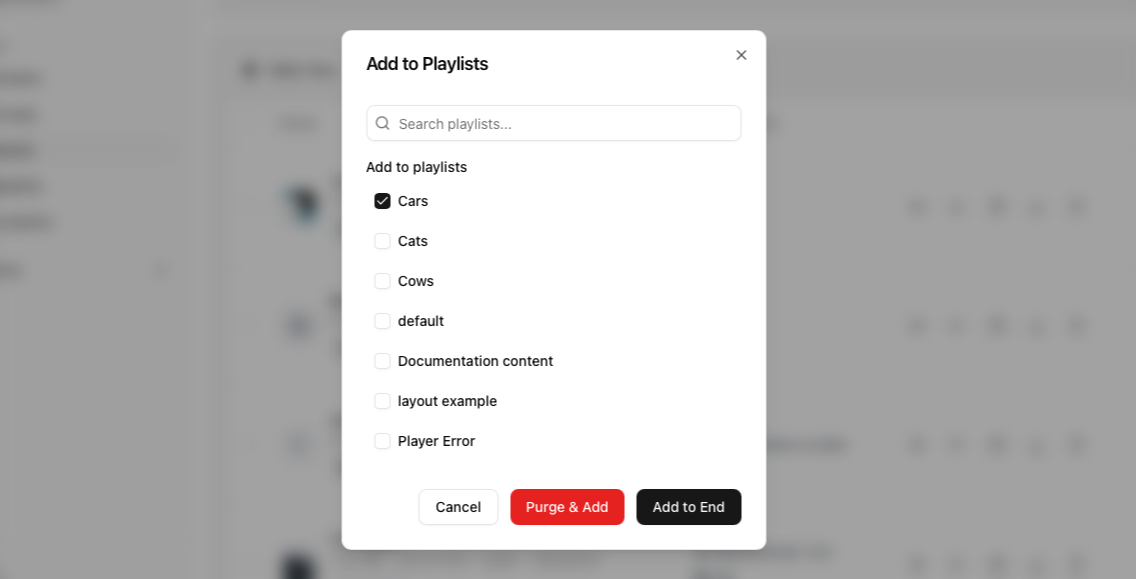
Add to playlist
Add an asset directly to your favourite playlist. You have two options
Purge & add: clears the entire playlist and adds the asset as the only asset in the playlist
Add to end: Adds the asset with default values to the end of the playlist
You can add an asset directly into a playlist as indicated in Playlists
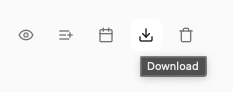
Download
Downloads the asset to your system
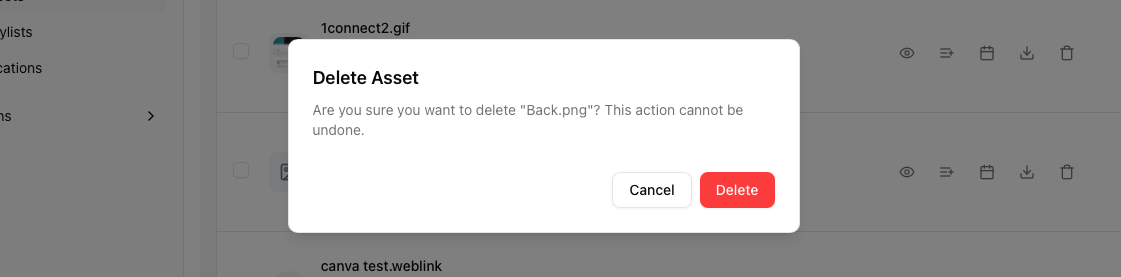
Delete
Deletes the asset permanently from your account.
Storage per account
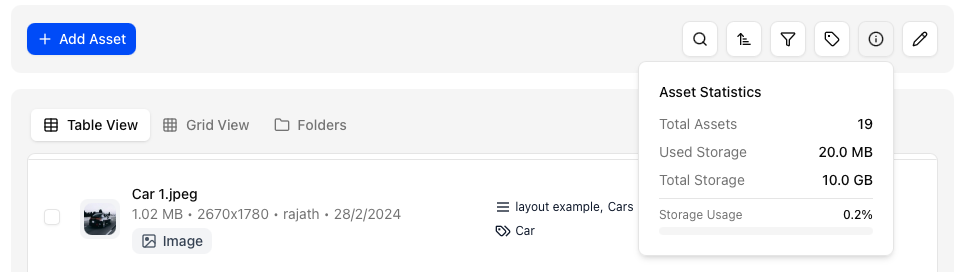 In PiSignage we add 1GB of storage per player license active. i.e if you have 10 active players, your account storage is 10GB. You can always choose to expand your storage by following the instructions present in Subscriptions and Licenses .