Playlists
The Playlists tab is where you sequence and group your content.
The playlists tab is where you choose what assets you want to group together and how you want to play them. Playlists primarily allow you to:
Choose assets
Configure some assets like PDF’s to play in presentation mode or Videos to play in mute
Choose the duration of each asset
Play around with the layout
Split screen or single screen
Select which assets are shown where on the screen
Setup advanced settings like
Advert content, domination content, etc
Choose a schedule template
Add RSS feeds and tickers
Creating a playlist
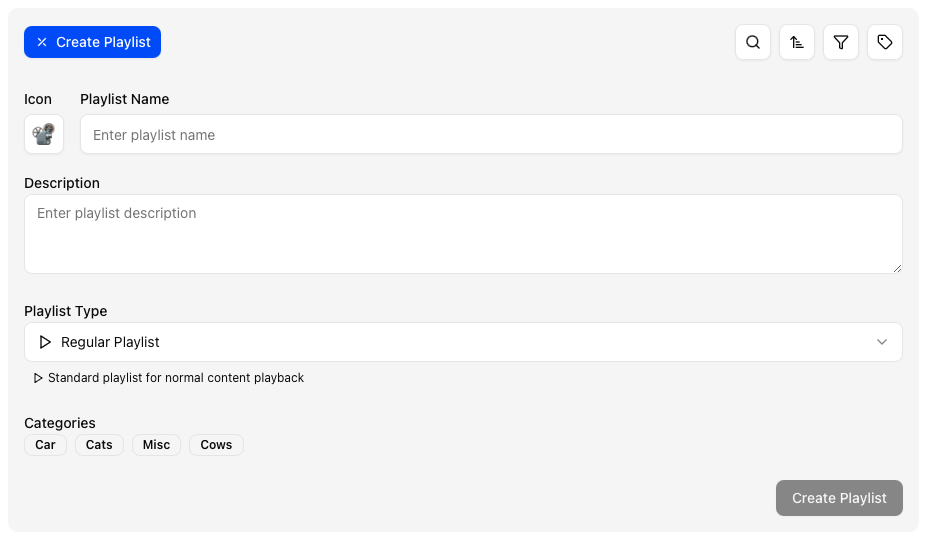
To create a playlist click on the ‘+ Create Playlist” button at the top of the playlist page. This should open a dialog to set the following
Name of your playlist
Emoji as a unique visual identifier to quickly find your playlist
Description,Helpful indicators or instructions related to your playlist
Type of playlist, regular works for most use cases but you could read more about types of playlists in the next section
Category to help sort and filter your accounts artifacts.
Types of Playlists
There are 6 types of playlists in PiSignage. You can change and manage the playlist settings by clicking on the playlist and navigating to the settings tab.
 Regular Playlist
A standard playlist with normal playback. Good for most usecases
 Advert Playlist
Assets in this playlist are inserted periodically (the interval can be set in settings) in-between any playlist scheduled for the same time.
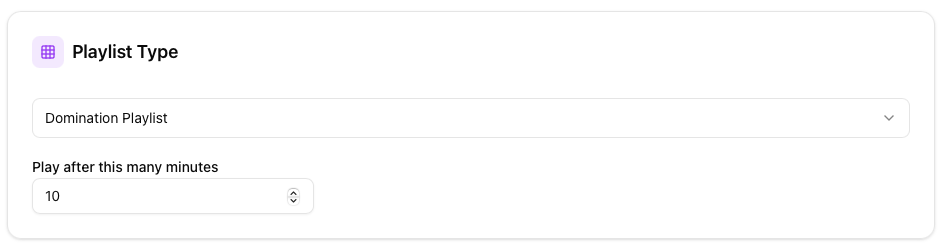 Domination Playlist
This playlist over-rides any currently playing playlist and plays in one full cycle before handing control back to the scheduled playlist. The interval for the domination is as decided by the user in settings.
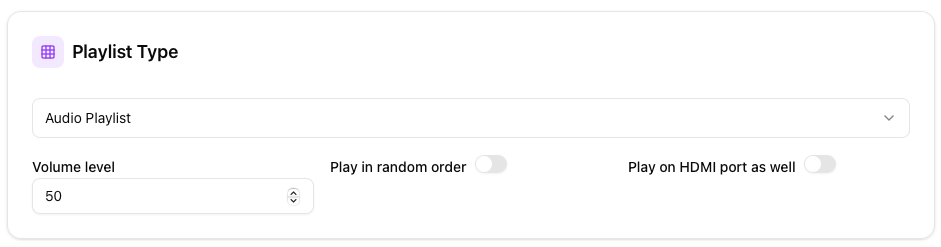 Audio Playlist
This playlist plays via the 3.5mm audio jack while any other playlist scheduled at the same time plays. Great for background music or radios.
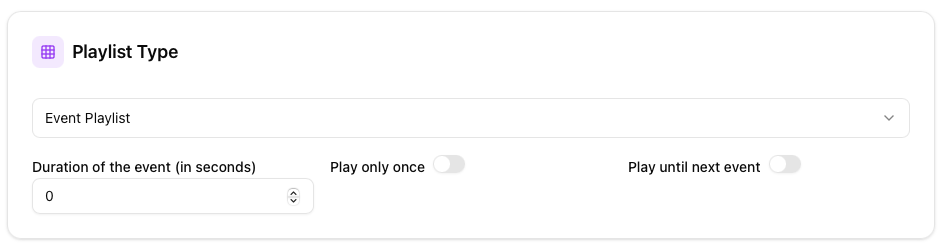 Event Playlist
This Playlist plays when the SIGUSR2 signal is received.
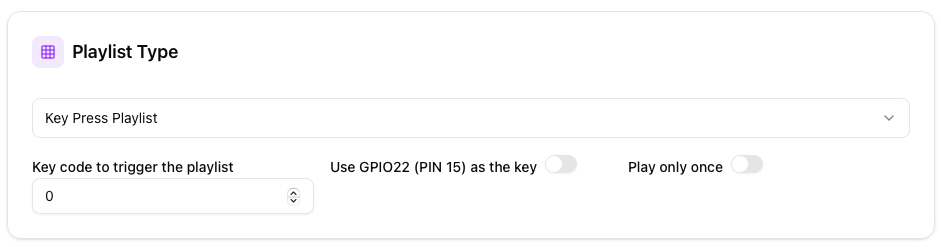 KeyPress Playlist
Like the event playlist but can be configured for any key being pressed on the keyboard or hardware.
Categories
Categories are tags that help organise and categorise your playlists. They are present throughout the platform (even in assets, groups, etc) to help categorise everything. Adding categories is as simple as clicking the relevant category to apply the same.
 You can find more information on categories in the Categories page.
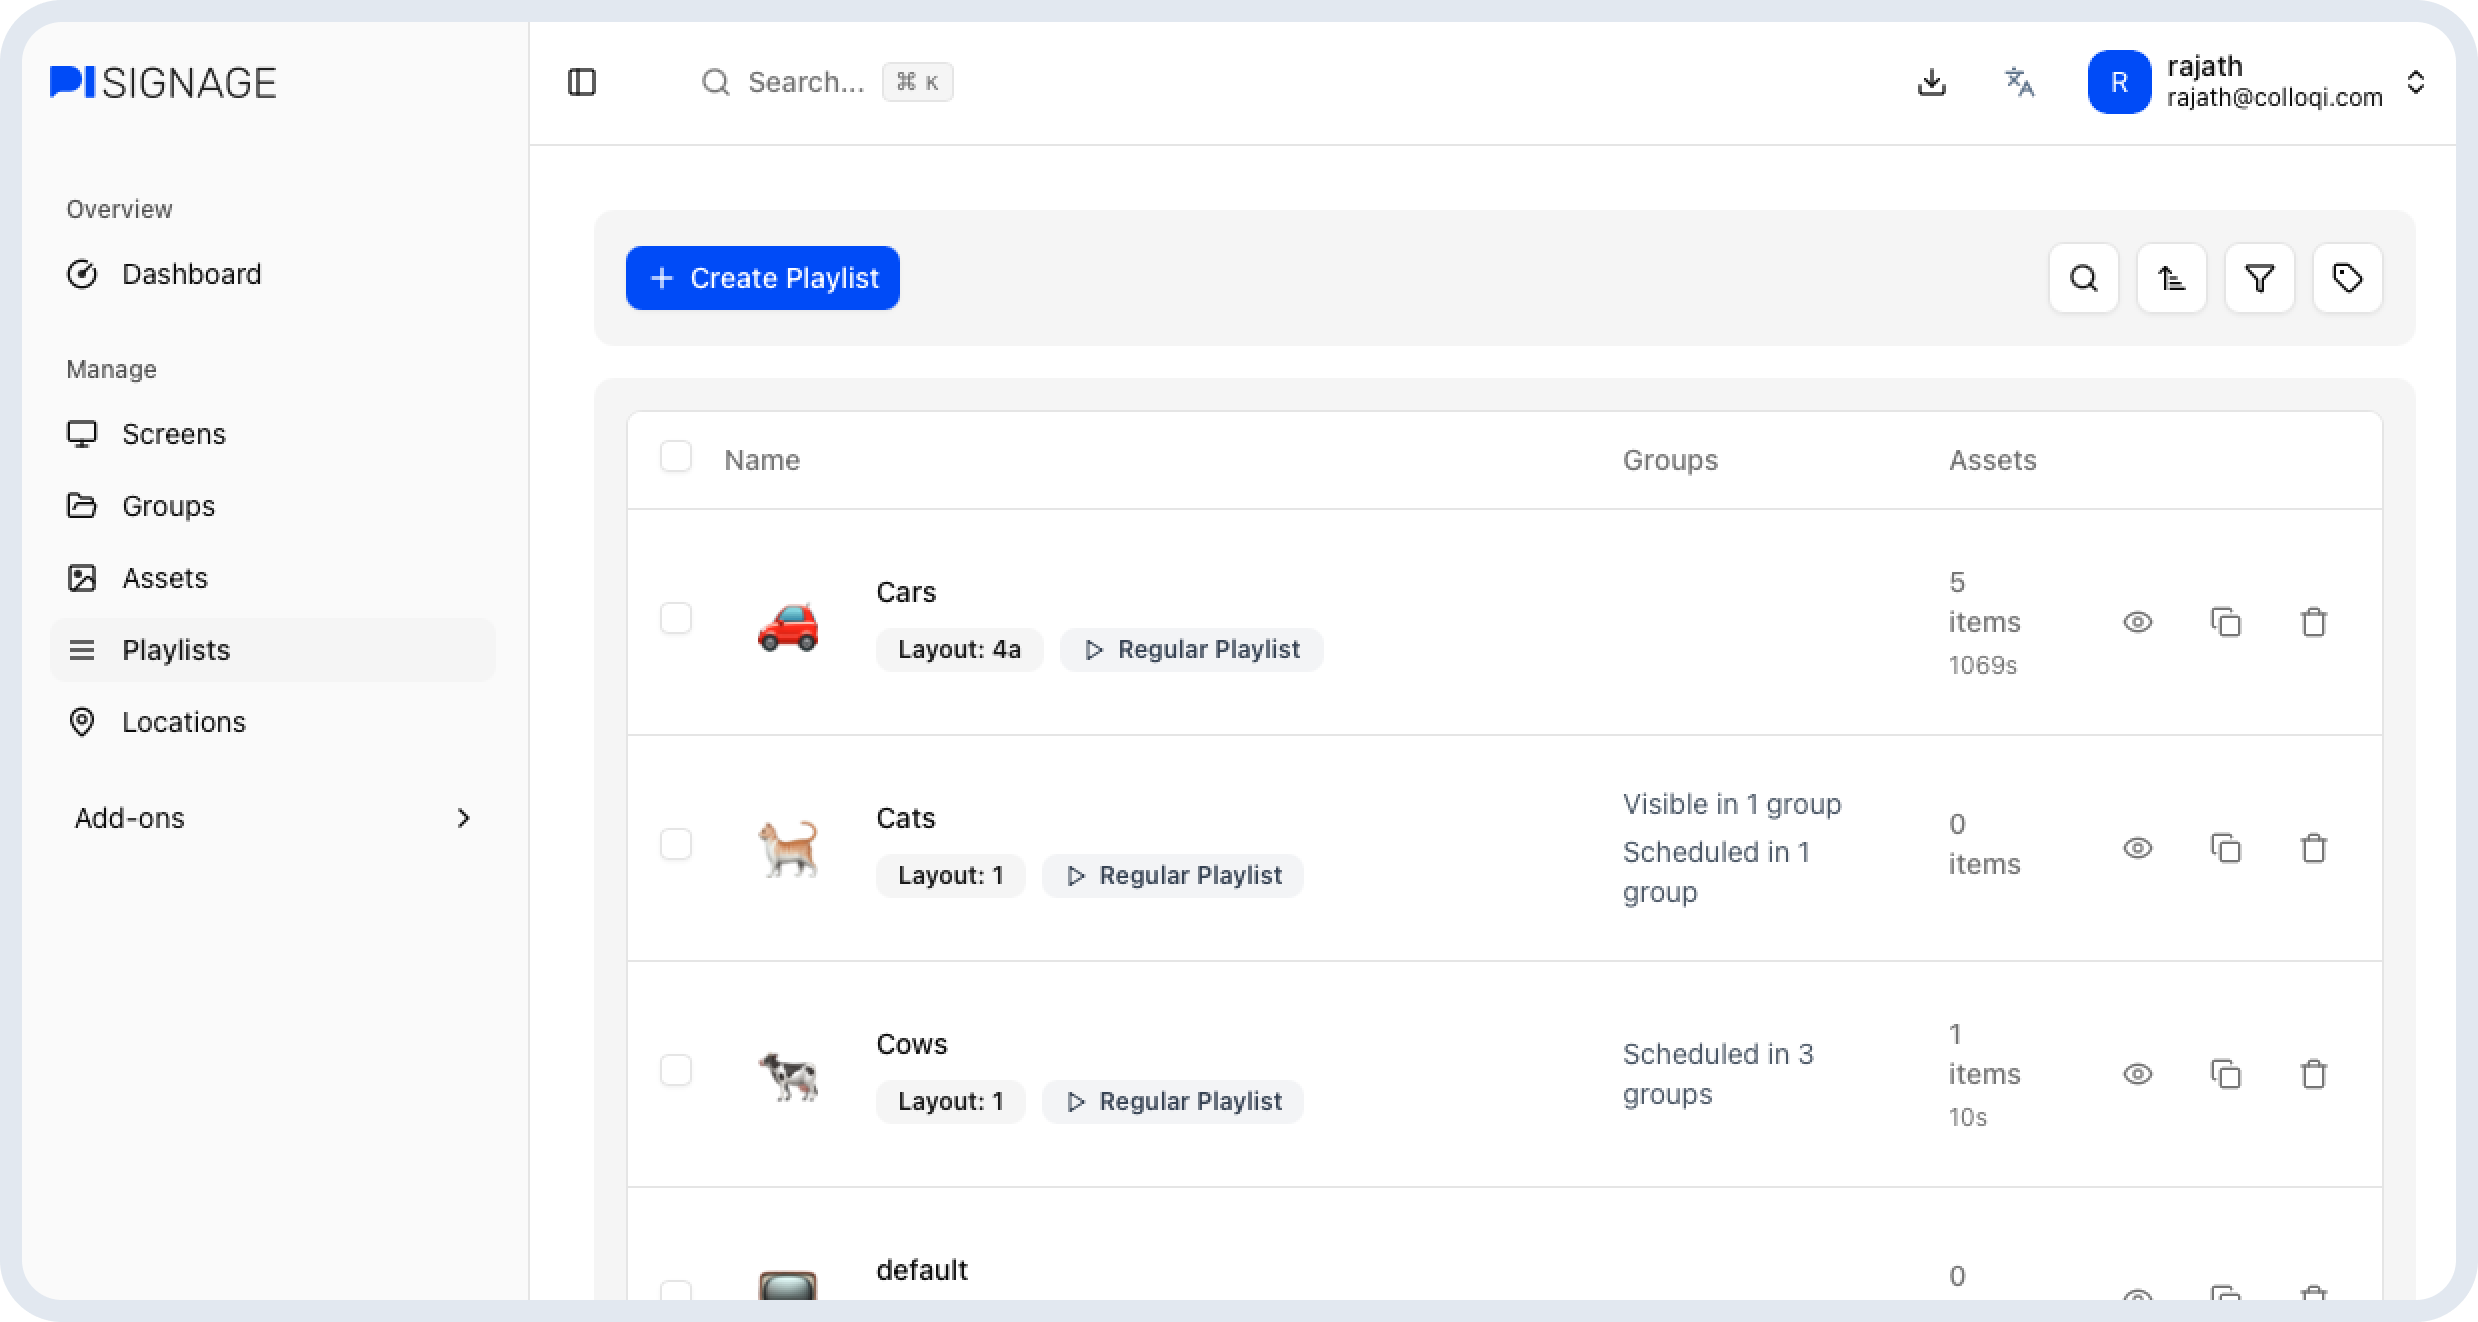
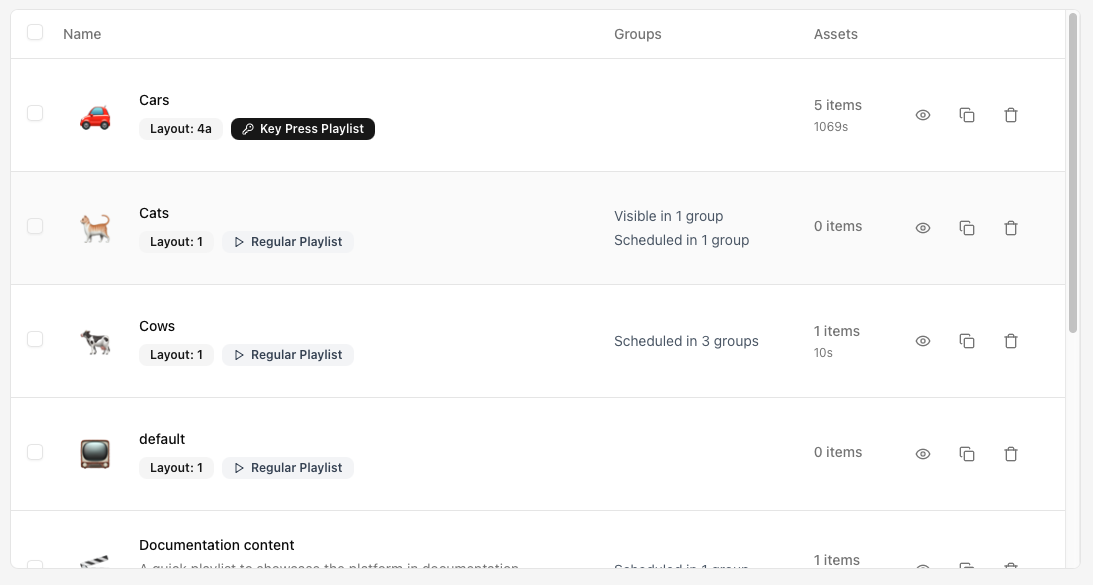
Playlist directory
The directory gives you an overview of all of your playlists and helps you manage them at a glance. Here you can view the groups it is visible (Collaborators management is when this is relevant) and scheduled in, number of assets, total duration and more…
Search, Filter and sort
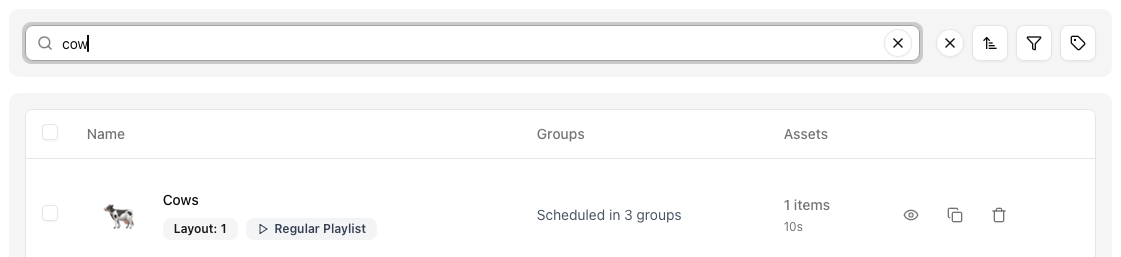 Search through your playlist.
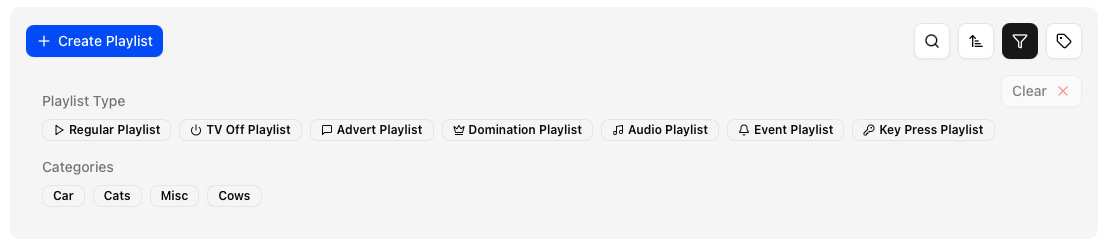 Filter using playlist types and categories.
 Sort your playlists by name or duration.
View
 View playlist helps open the playlist detail page which is better explained below. It is where you can choose assets, change settings, define layouts and more
Duplicate
 Create a copy of your playlist with all of the same assets and settings applied
Bulk actions
 Here you can select multiple playlists to bulk update categories, Assign them to a group (which makes them visible to the group, ref: Collaborators) Schedule them to a group, duplicate or delete.
Manage playlist
You can access the Playlist detail page by clicking on a playlist. 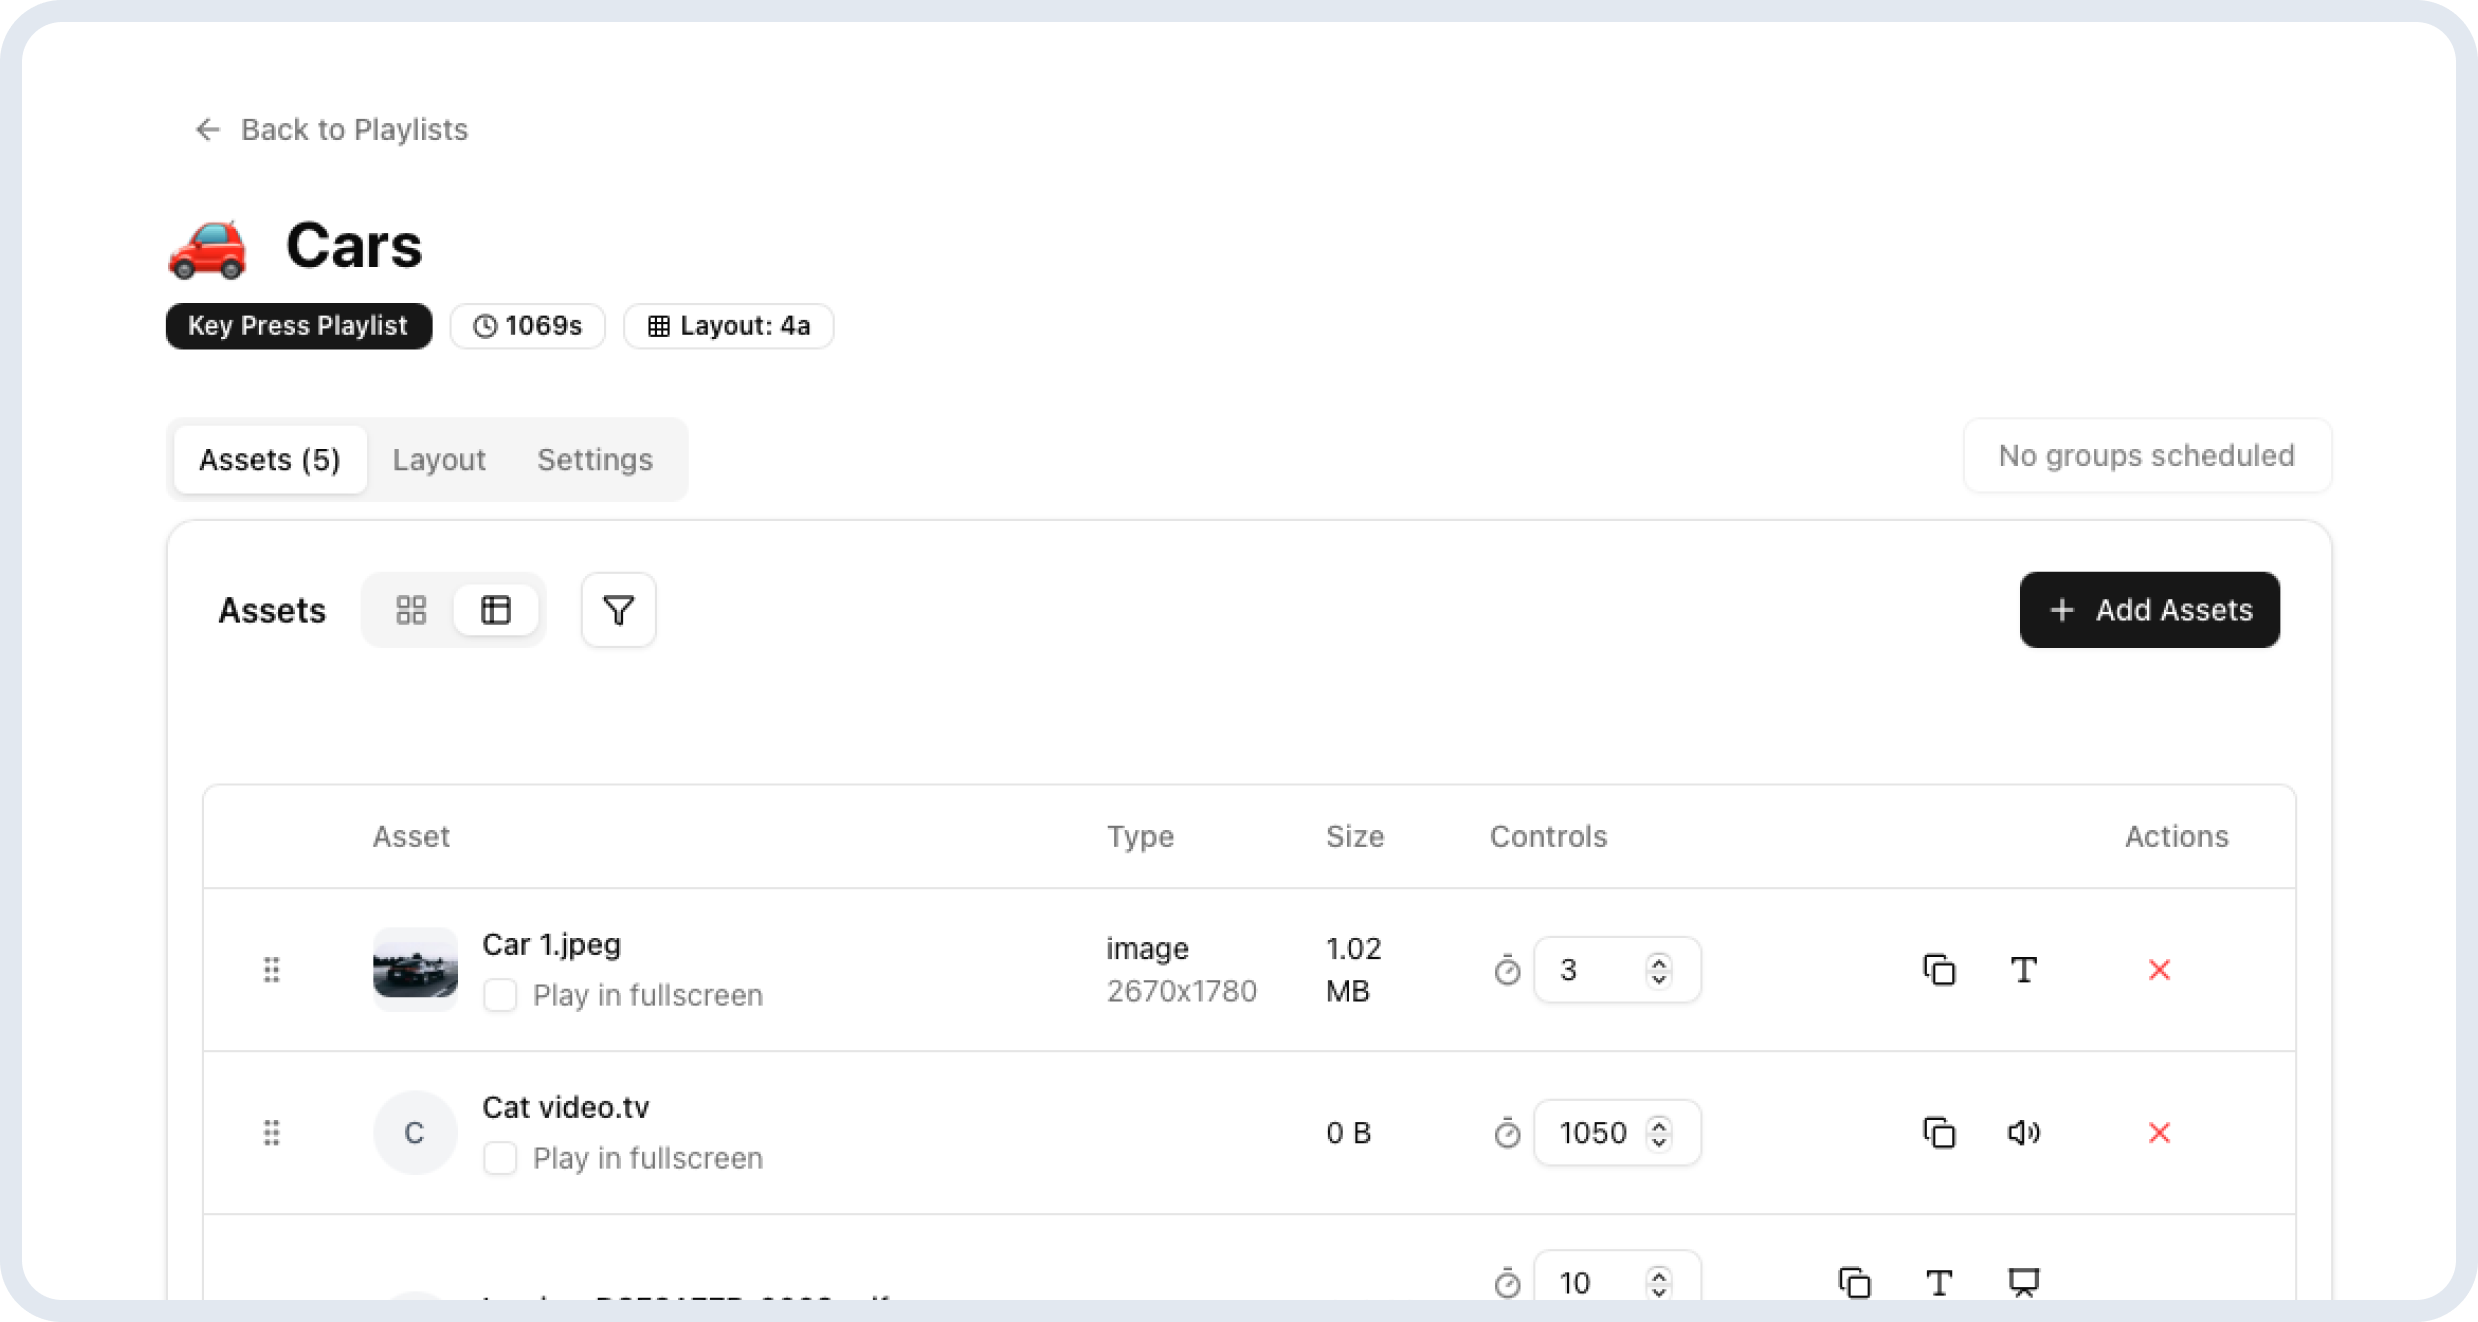
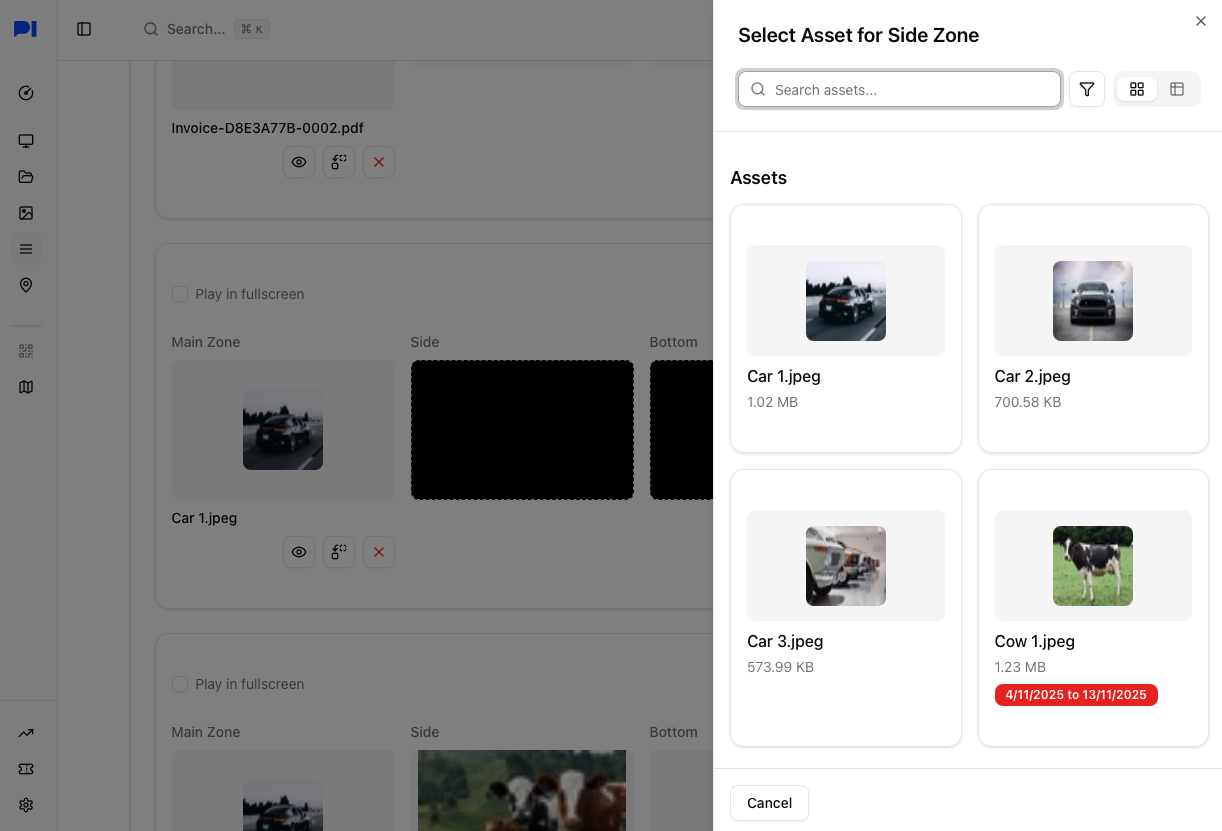
Assets
Assets is where you can add assets to your playlist.
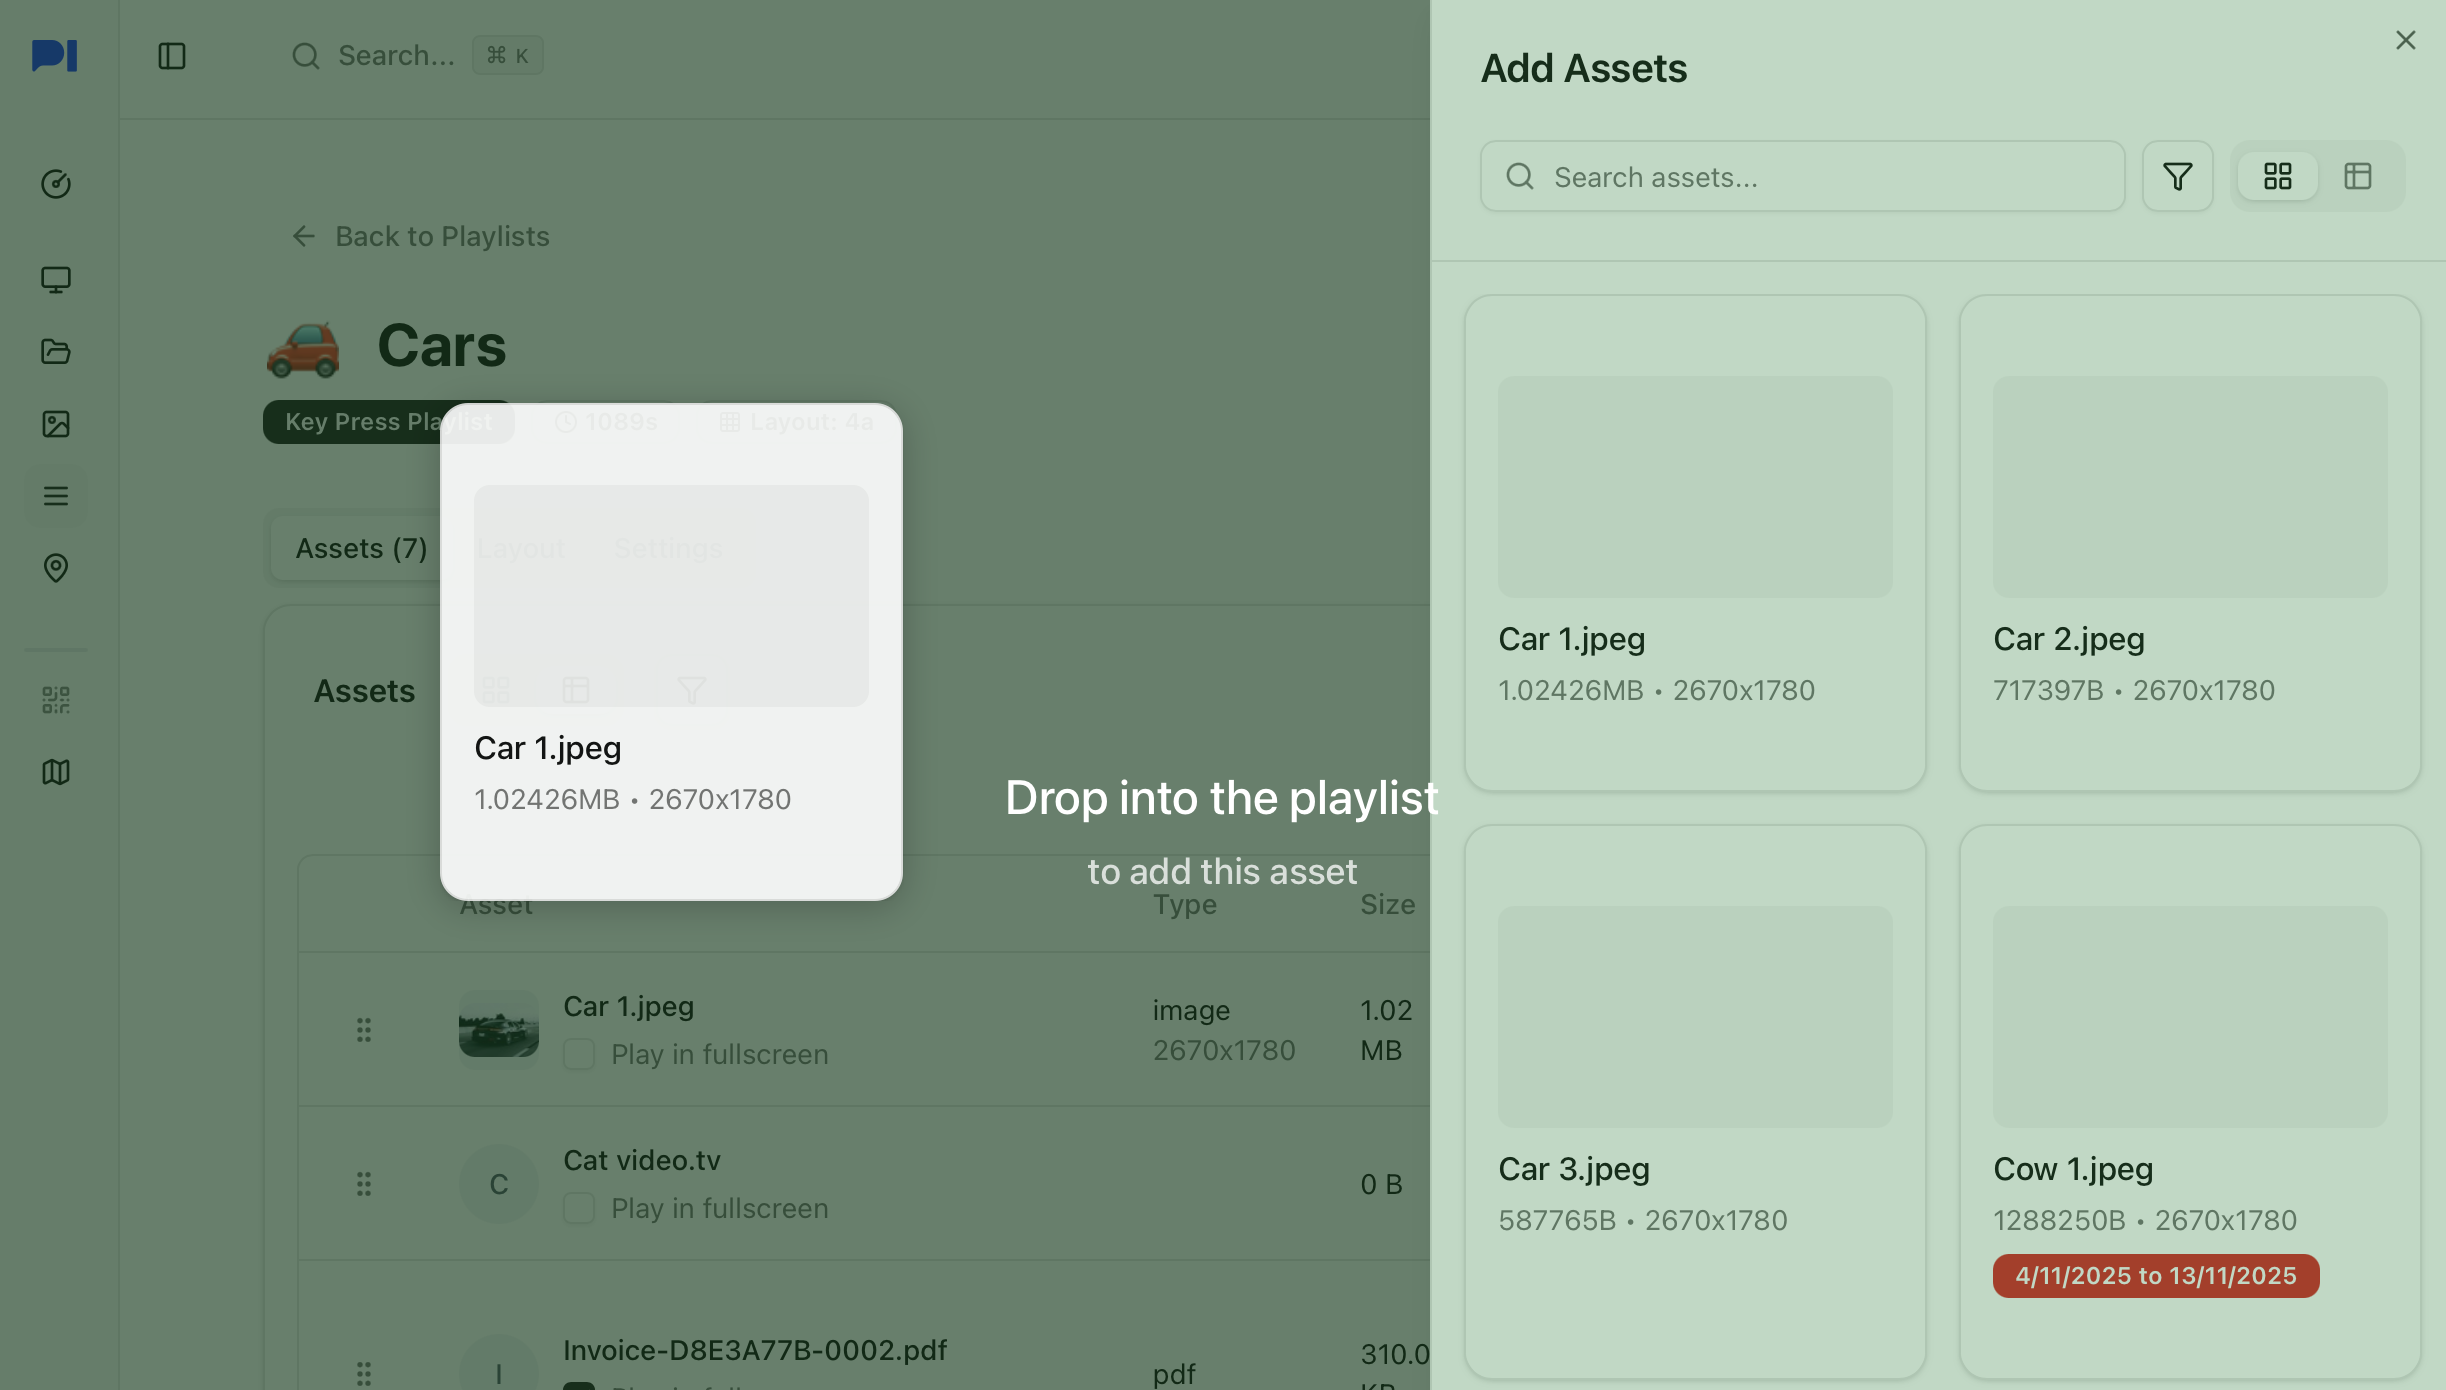
To add assets
simply click on the add assets button to open the assets pane. click on the assets to be added or drag and drop the same to add them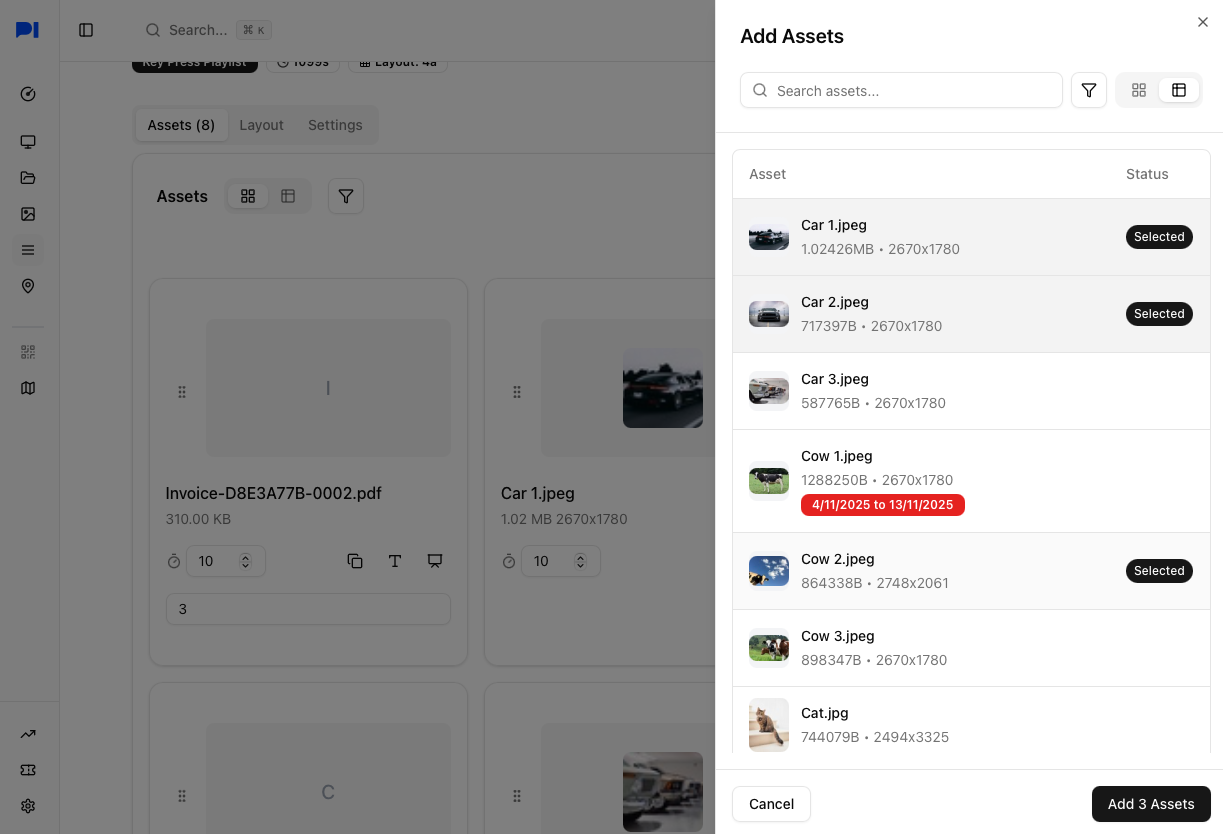
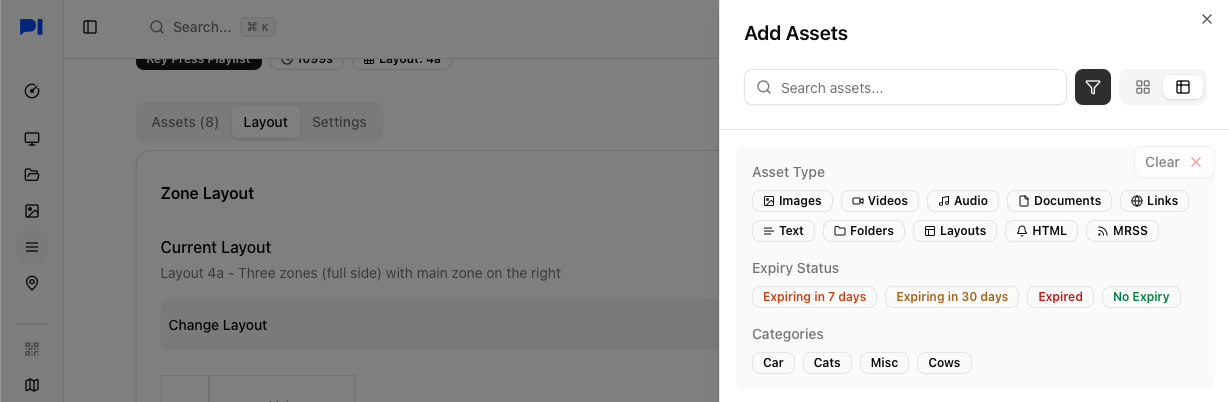
 Search, Filter and Sort
You can also use the filter options in the assets pane to narrows down or filter assets.
Configuring assets
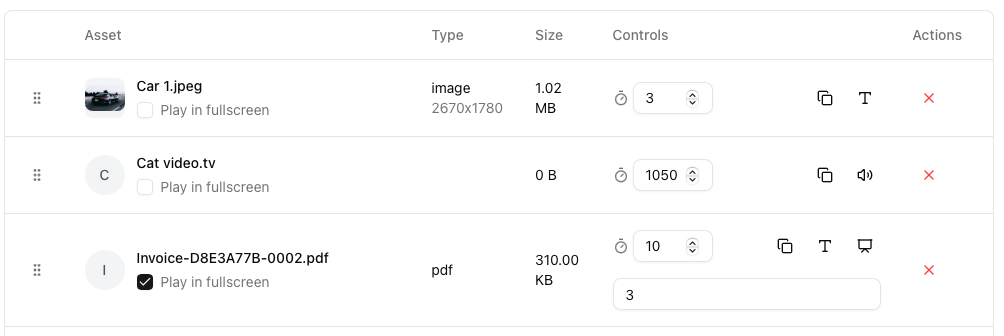
Once added you will see a few options depending on the type of asset
Play in full screen: This over-rides any layouts (explained in the next section) and plays the asset in fullscreen
Duration tells the platform how long you want each asset to play in the playlist
Text overlay adds a message to be displayed over an asset. It appears over the center of the asset
Audio specific controls
- Play in background plays the asset as background audio while moving to the next asset
Video specific controls
- Mute video will mute all audio from the video, youtube video, stream, etc
PDF specific controls
- Play in presentation mode plays each page of the PDF for the duration spedified. The total duration of the PDF will still apply and may cut off the PDF from playing each page. i.e for a 10 page PDF playing at 5seconds per page, the totla duration must be 50 seconds else the pages will not display after the cut off.
Re-order the assets
By dragging and dropping the assets with the drag handles. The assets play in the order that they are in (left to right or top to bottom based on the view selected).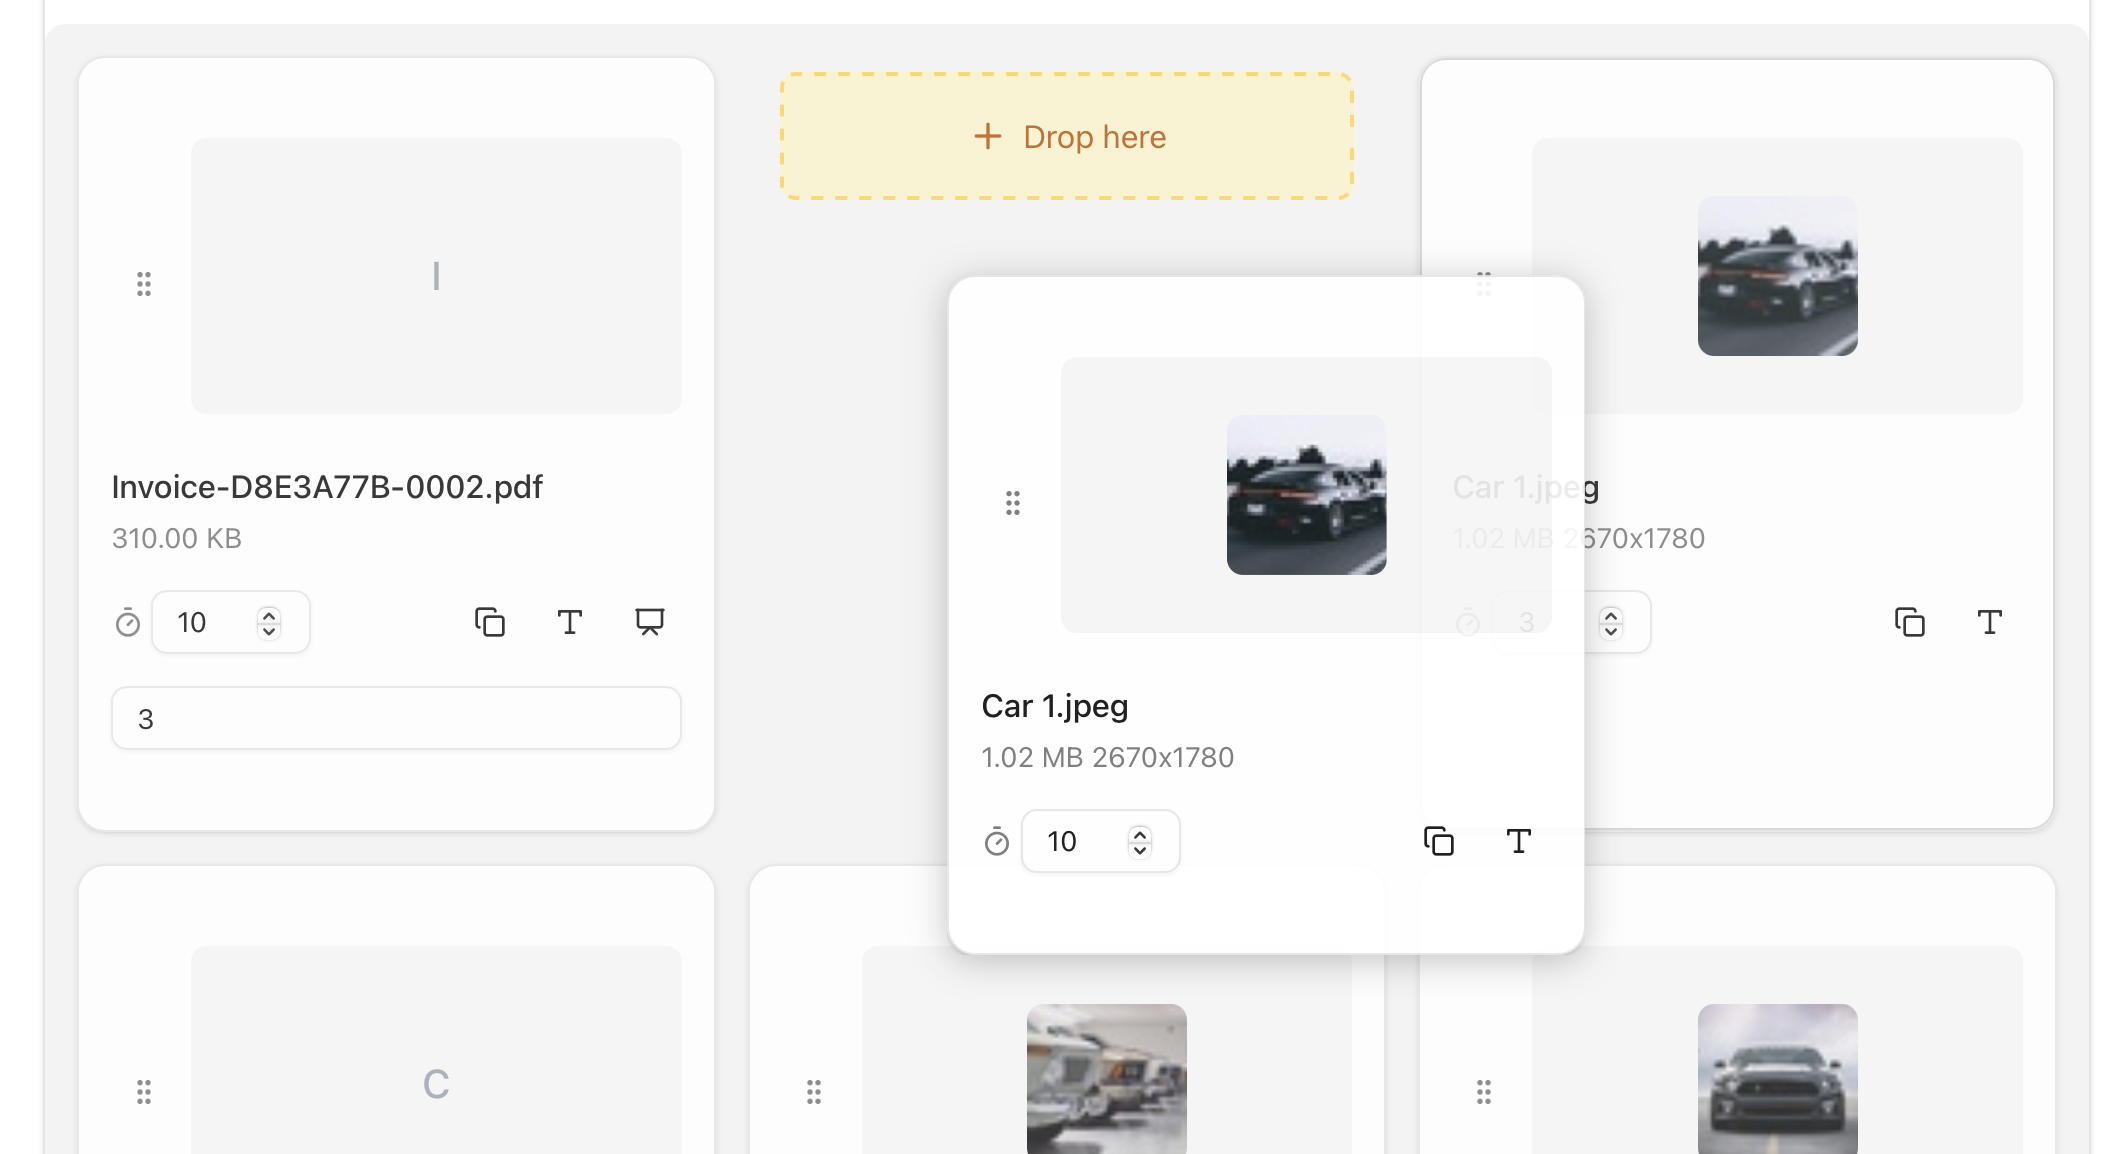
Layout1
Layouts help configure your playlist to show multiple assets on the same screen by splitting the screen as desired. Template Designer allows you to create your own custom layouts.
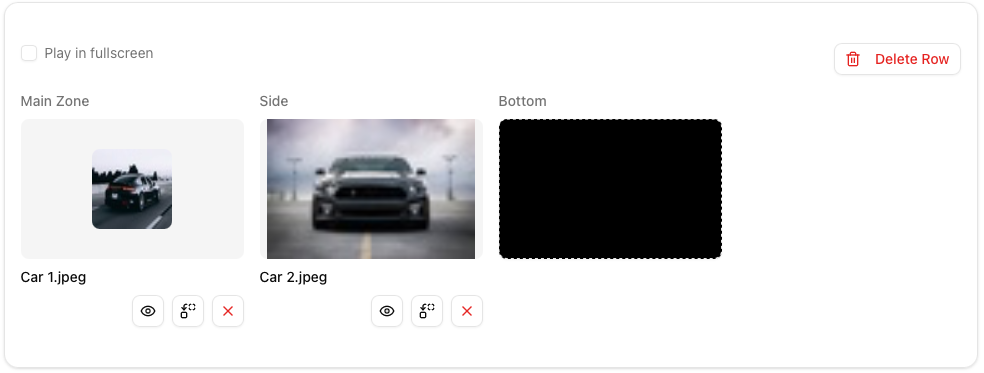
In any layout the screen is divided into zones. These zones are where you configure and place assets. An example of one such layout is below. PiSignage supports upto 6 zones in a layout

Choosing a layout
By default the chosen layout will be “1” which is a single zone layout. You can click on “Change” layout which will show you all available layouts. 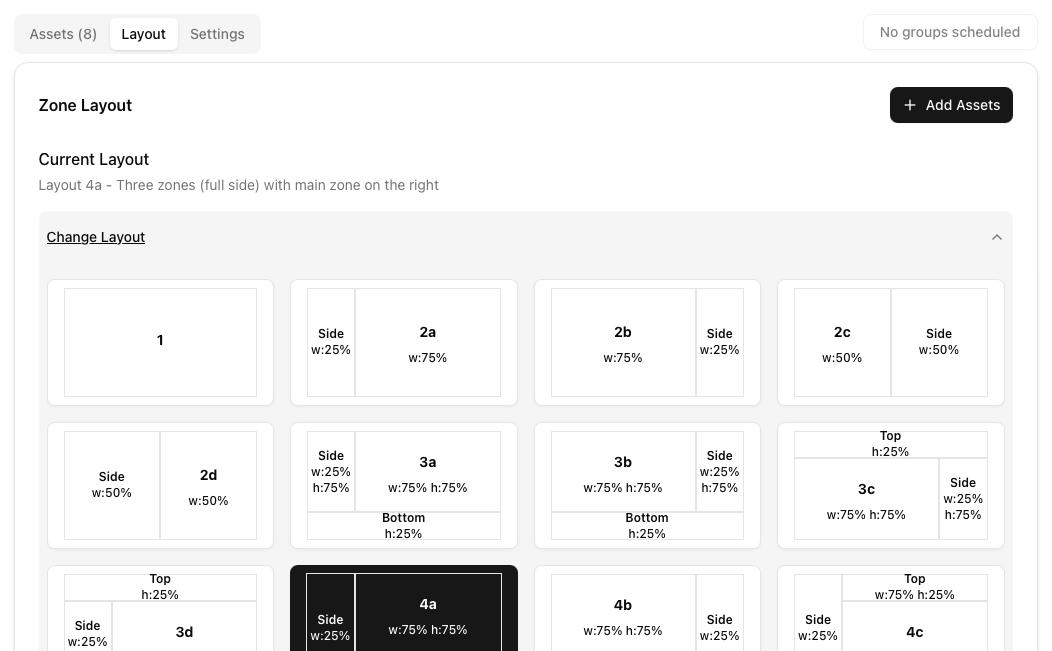
Once selected the rows below will begin showing the zones as indicated by the layout.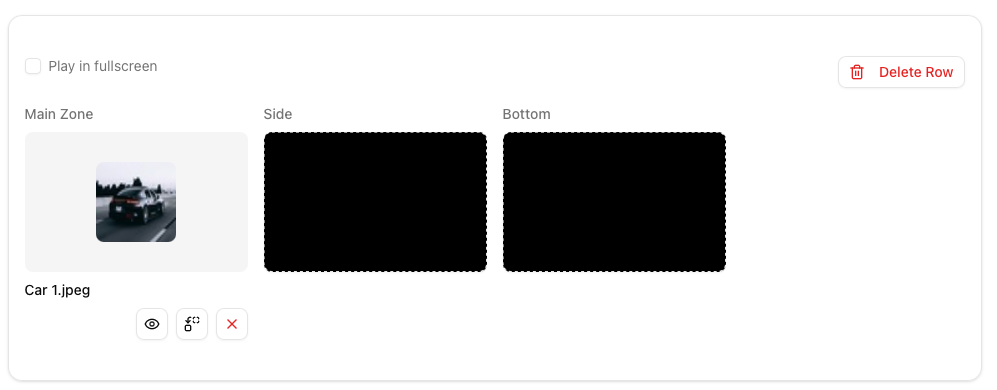
Configuring asset rows
Now that you have everything setup it is time to select what plays where and when.
The play in fullscreen option has the asset in the “Main Zone” override the layout and play in full screen.
 Clicking on an empty zone will open the Assets pane and allow you to choose an asset from the same. On choosing the asset it will now appear in that zone.
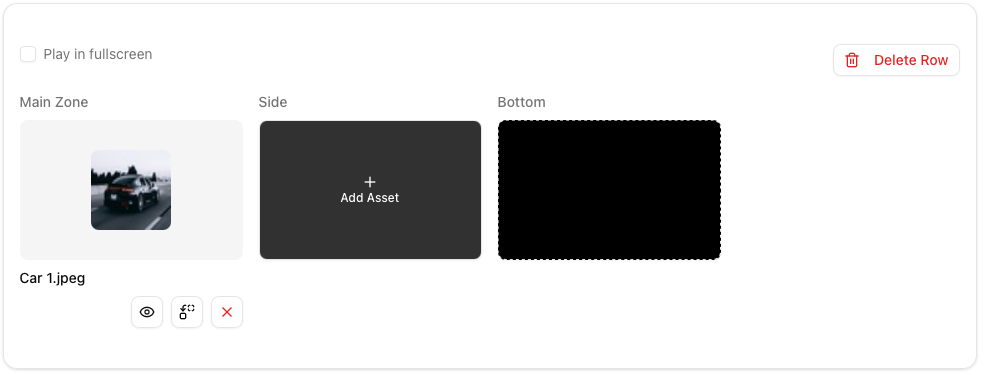
 Once configured all empty zones below inherit the last chosen asset in that zone. i.e even though the main zone asset changes the side zone continues to show the same asset through it all. You can click on an inherited asset to replace the same.
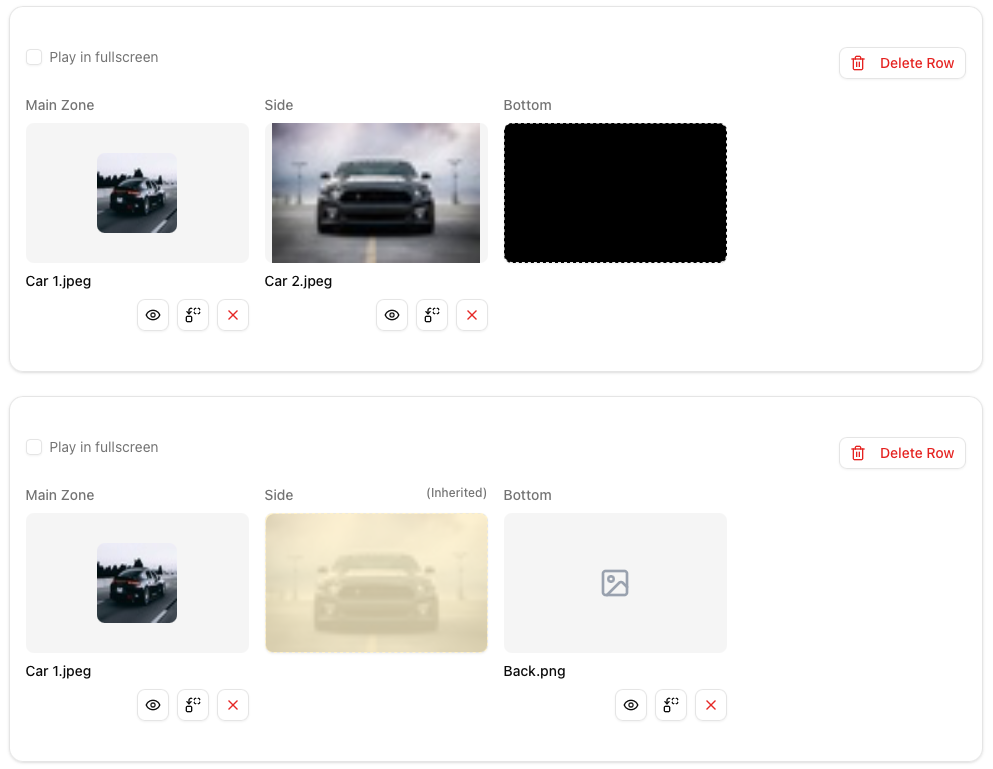 The rows give you a good indication of all of how the zones will look like on the screen (eg: empty zones will appear black as shown in the UI).
Settings
Basic information
Modify the name, description or emoji associated with the playlist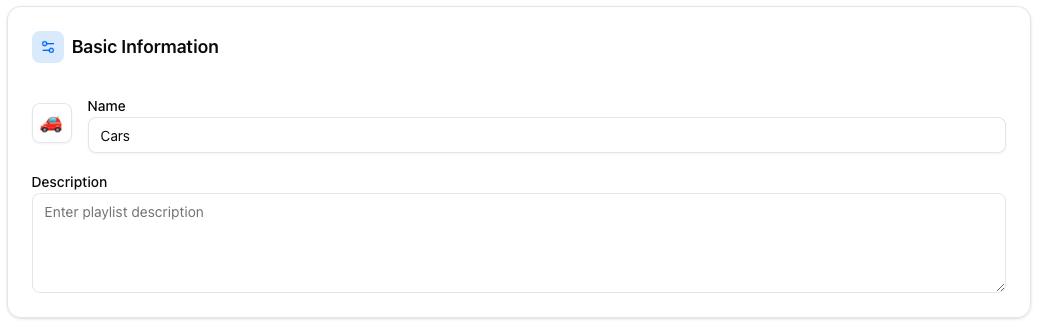
Playlist type
Set the properties specific to your playlist type. Namely as below
Regular playlist: None
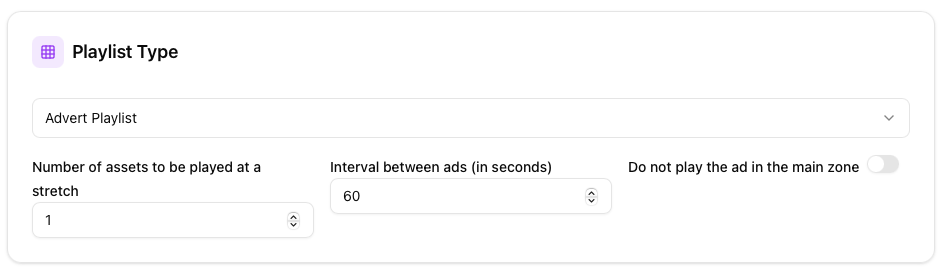 Advert playlist:
Number of assets to be played during the interruption
Interval between ads is where the main playlist plays before the next ad break
Do not play the ad in the main zone: Ensures that your assets are restricted to only zones outside the main zone (side, bottom, etc). Read layouts[1] above for more information.
Domination playlist:
- Play after this many minutes is interval where the main playlist is interrupted every ‘x’ minutes
Audio playlist:
Volume level of the playlist.
Play in random order randomises all of the audio from the assets.
Play on HDMI port as well plays the audio on the 3.5mm audio jack and the HDMI port playing the same as the background audio on the TV as well.
Event playlist:
This Playlist plays when the SIGUSR2 signal is received.
What is SIGUSR2
The SIGUSR2 signal is a user-defined signal used for simple interprocess communication in Linux environments, including on a Raspberry Pi running Raspberry Pi OS (a Debian-based Linux distribution). It has no default system action other than process termination, so you must explicitly define a signal handler in your code to use it effectively.
Below are examples in Python and C.
Python Example
This Python script demonstrates how to set up a signal handler for SIGUSR2 in one process and trigger it from another, or from the terminal.
signal_handler.py (The Receiving Process):
python
import os
import signal
import time

Define the signal handler function
def receive_sigusr2(signal_number, frame):
    print(f"\nReceived signal: {signal_number} (SIGUSR2)")
    print("Performing custom action (e.g., reloading config, toggling a GPIO pin)...")
Register the SIGUSR2 signal handler
signal.signal(signal.SIGUSR2, receive_sigusr2)
print(f"My PID is: {os.getpid()}")
print("Waiting for SIGUSR2... (Press Ctrl+C to exit)")
Keep the program running indefinitely
while True:
    time.sleep(1)
How to run it:
Save the code above as
signal_handler.pyon your Raspberry Pi.Open a terminal and run the script:
bash
python3 signal_handler.pyNote down the PID (Process ID) printed by the script (e.g.,
My PID is: 12345).
Sending the signal:
Open a second terminal and use the kill command to send the SIGUSR2 signal to the noted PID:
bash
kill -SIGUSR2 <PID>
# or using the signal number (SIGUSR2 is typically 12)
kill -12 <PID>
You will see the message "Received signal: 12 (SIGUSR2)" in the first terminal each time you send the signal.
C Example
This C program shows how to use sigaction (a more reliable way to handle signals than signal()) to catch SIGUSR2.
sigusr2_example.c (The Receiving Process):
c
#include <stdio.h>
#include <signal.h>
#include <unistd.h>
#include <string.h>
void signal_handler(int signum) {
if (signum == SIGUSR2) {
printf("\nReceived SIGUSR2 signal!\n");
printf("Performing some action...\n");
}
}
int main() {
struct sigaction sa;
// Zero out the structure
memset(&sa, 0, sizeof(sa));
// Set the handler function
sa.sa_handler = signal_handler;
// Install the signal handler for SIGUSR2
if (sigaction(SIGUSR2, &sa, NULL) == -1) {
perror("sigaction");
return 1;
}
printf("My PID is: %d\n", getpid());
printf("Waiting for SIGUSR2...\n");
// Keep the program running
while (1) {
sleep(1);
}
return 0;
}
How to run it:
Save the code as
sigusr2_example.c.Compile it using GCC:
bash
gcc sigusr2_example.c -o sigusr2_exampleRun the compiled program in one terminal:
bash
./sigusr2_exampleNote the printed PID.
Sending the signal:
In a second terminal, send the signal using kill and the PID:
bash
kill -SIGUSR2 <PID>
Duration of the event is the duration of time the playlist is to be played after the event is triggered. 0 and 1 are special values as defined below. All other values are taken in seconds.
0Plays the playlist till the next event takes place1Plays the playlist once
Play only once plays the entirety of the playlist in one cycle before resetting the usual content
Play until next event: plays the event playlist until the event is detected again
Key Press playlist:
Key-code to trigger playlist: Every Key pressed corresponds to a code value. You can directly configure the playlist to play on receiving a certain code value. PLEASE MAKE SURE TO ENTER THE SAME IN DECIMAL AND NOT HEX VALUES.
some examples for a standard keyboard are as below https://developer.mozilla.org/en-US/docs/Web/API/UI\\\\\\\\\\\\\\\\\\\\\\\\\\\\\\\\Events/Keyboard\\\\\\\\\\\\\\\\\\\\\\\\\\\\\\\\event\\\\\\\\\\\\\\\\\\\\\\\\\\\\\\\\code\\\\\\\\\\\\\\\\\\\\\\\\\\\\\\\\valuesUse GPIO22 as the key: Configure your custom hardware to connect to the Raspberry Pi GPIO22 Pin. You can configure the key code and enter the same.
Play only once will play the playlist in its entirety once pressed.
Play when online
This ensures if the playlist is configured to play along with a fall back in Groups , it plays only when the player has a connection to the internet. This is great for playlists with livestreams, youtube videos, weblinks and other online assets

Categories
You can select and configure Categories attached to the player here.

Groups
Configure the groups the playlist is visible (Collaborators management is when this is relevant) and scheduled in

Ticker
Add a RSS or message based ticker to the bottom of your screen. You can choose between 3 kinds of tickers here
Text associated to the asset (text overlays, etc)
Messages
RSS text
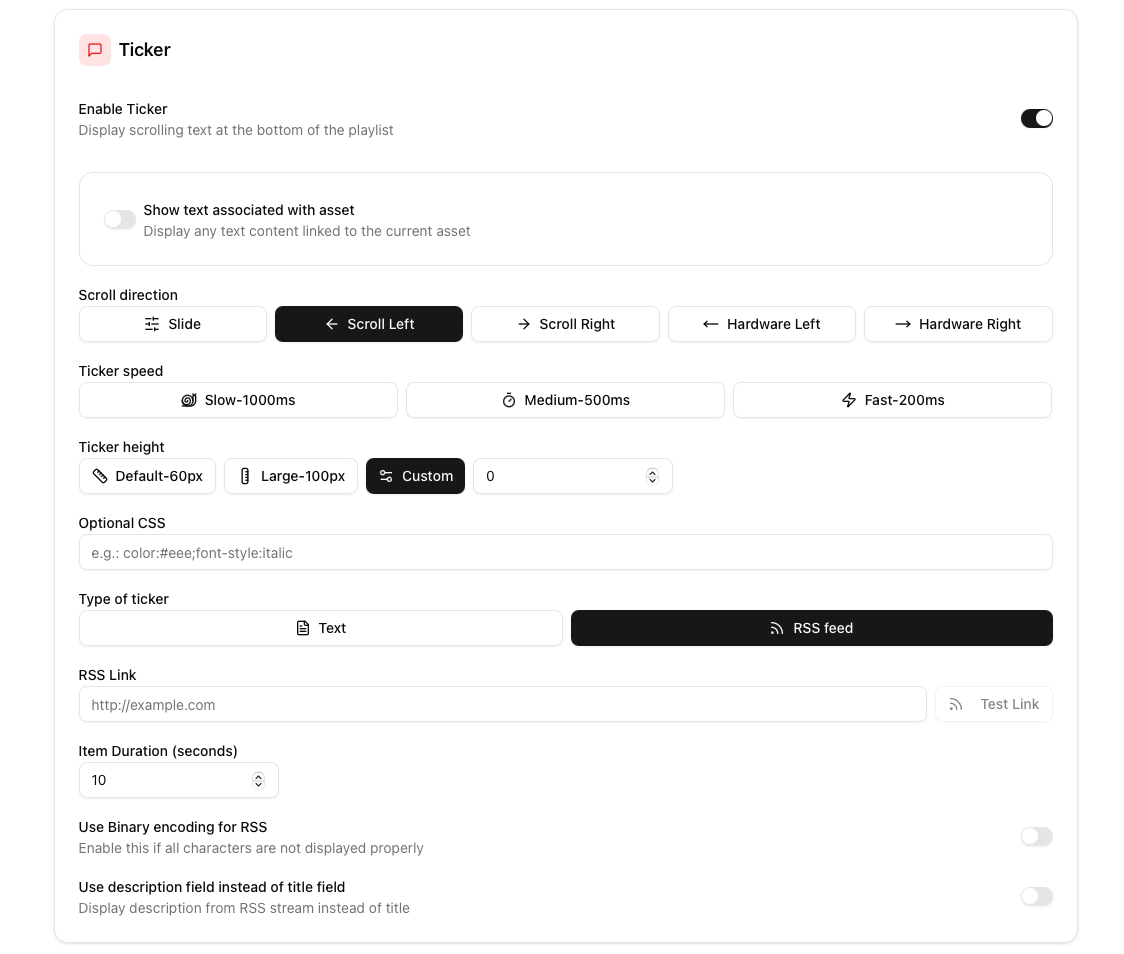 Configure the scroll direction, Ticker speed, Ticker height along with optional CSS to change its styling.
When using an RSS, you can choose between the description or title field. To display an RSS feeds images along with text refer to Assets
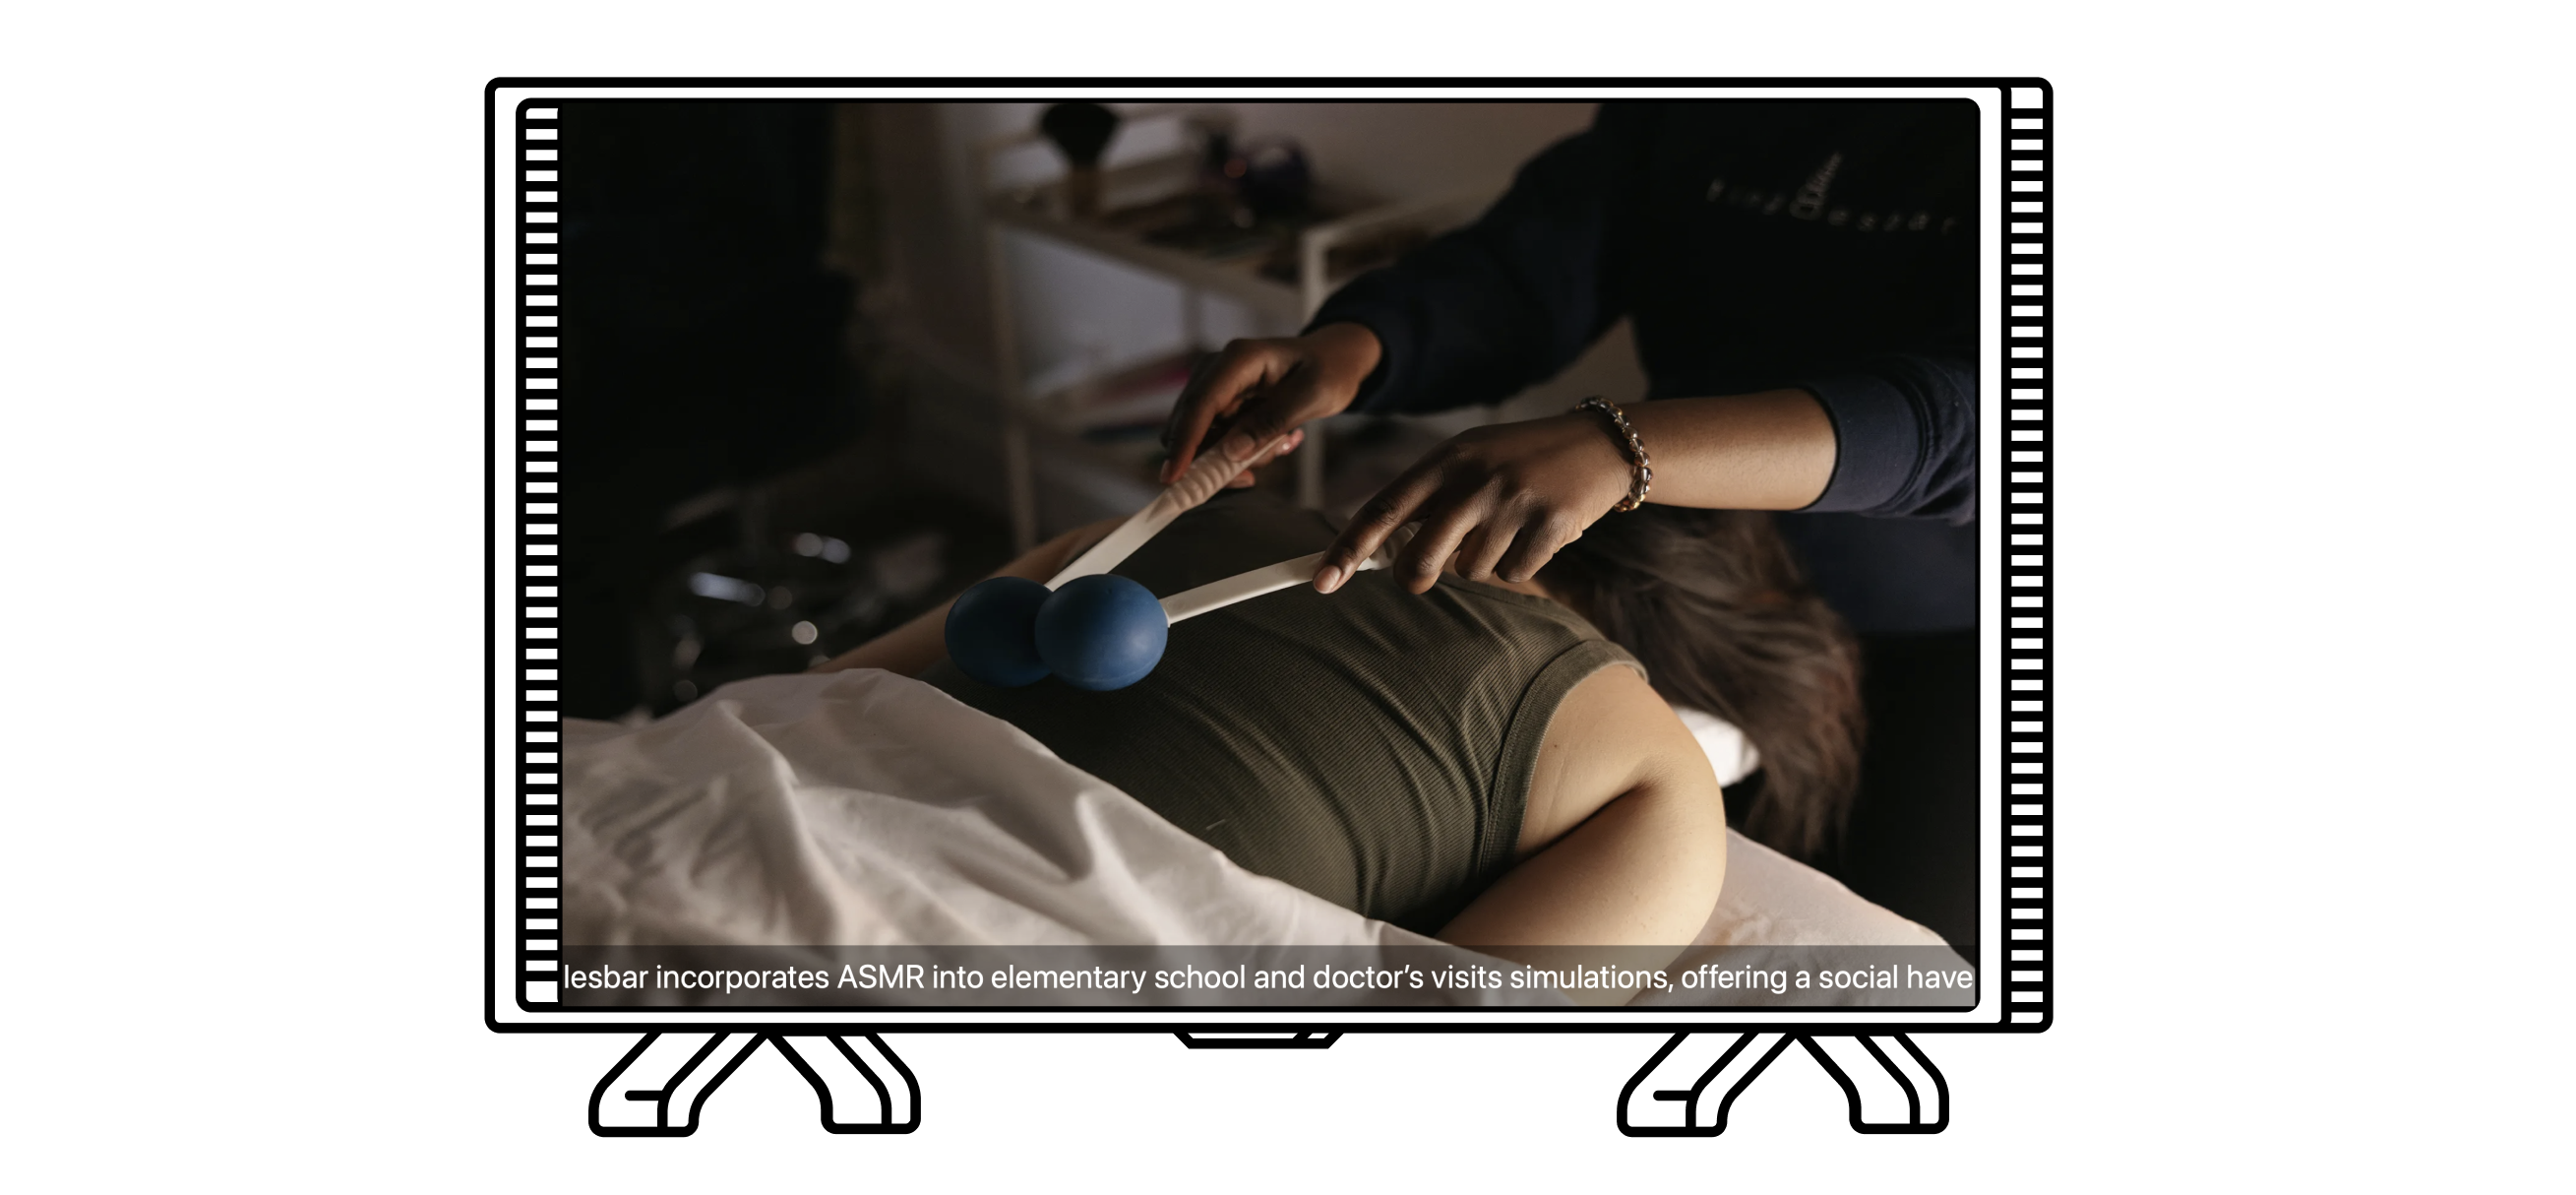
Below is an example of what an RSS ticker looks like.
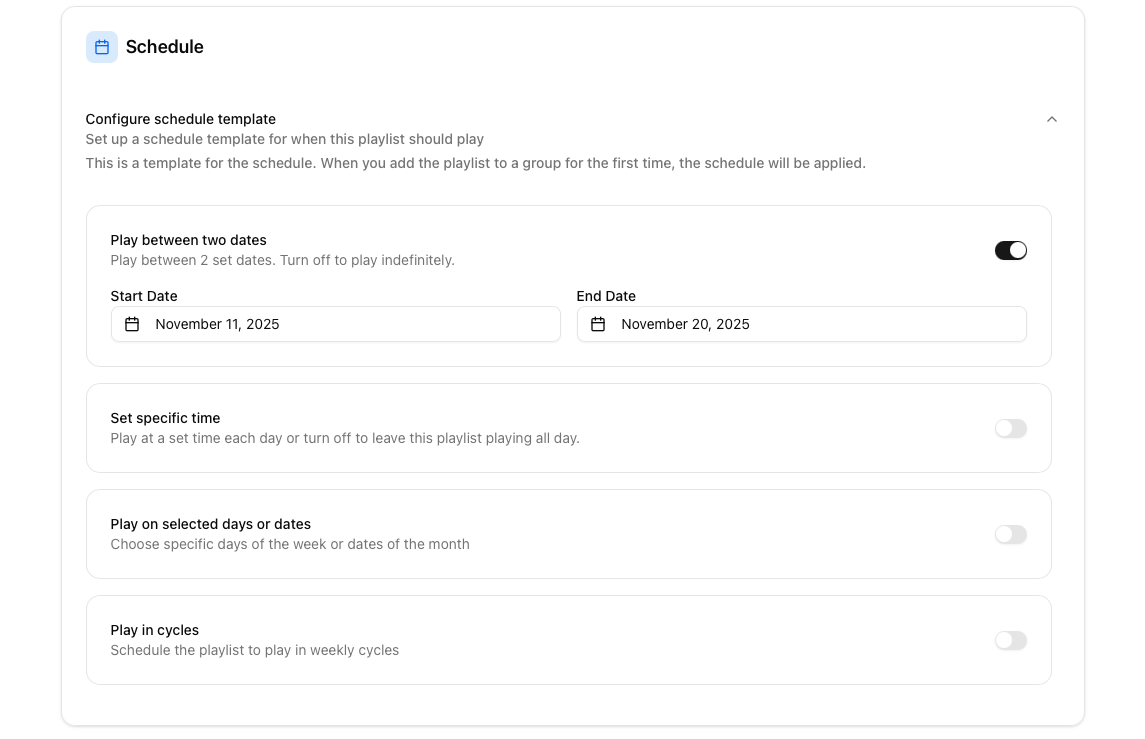
Schedule
Schedule templates allow you to add a template that will then apply as the default schedule for the playlist whenever added to a Groups
Schedules include
A start and end date
Specific time window it plays during
Selected days or dates that can be chosen as a window to be played (eg, A specific playlist for whenever the 2nd falls on a wednesday)
Play in cycles of 3,4,5 weeks